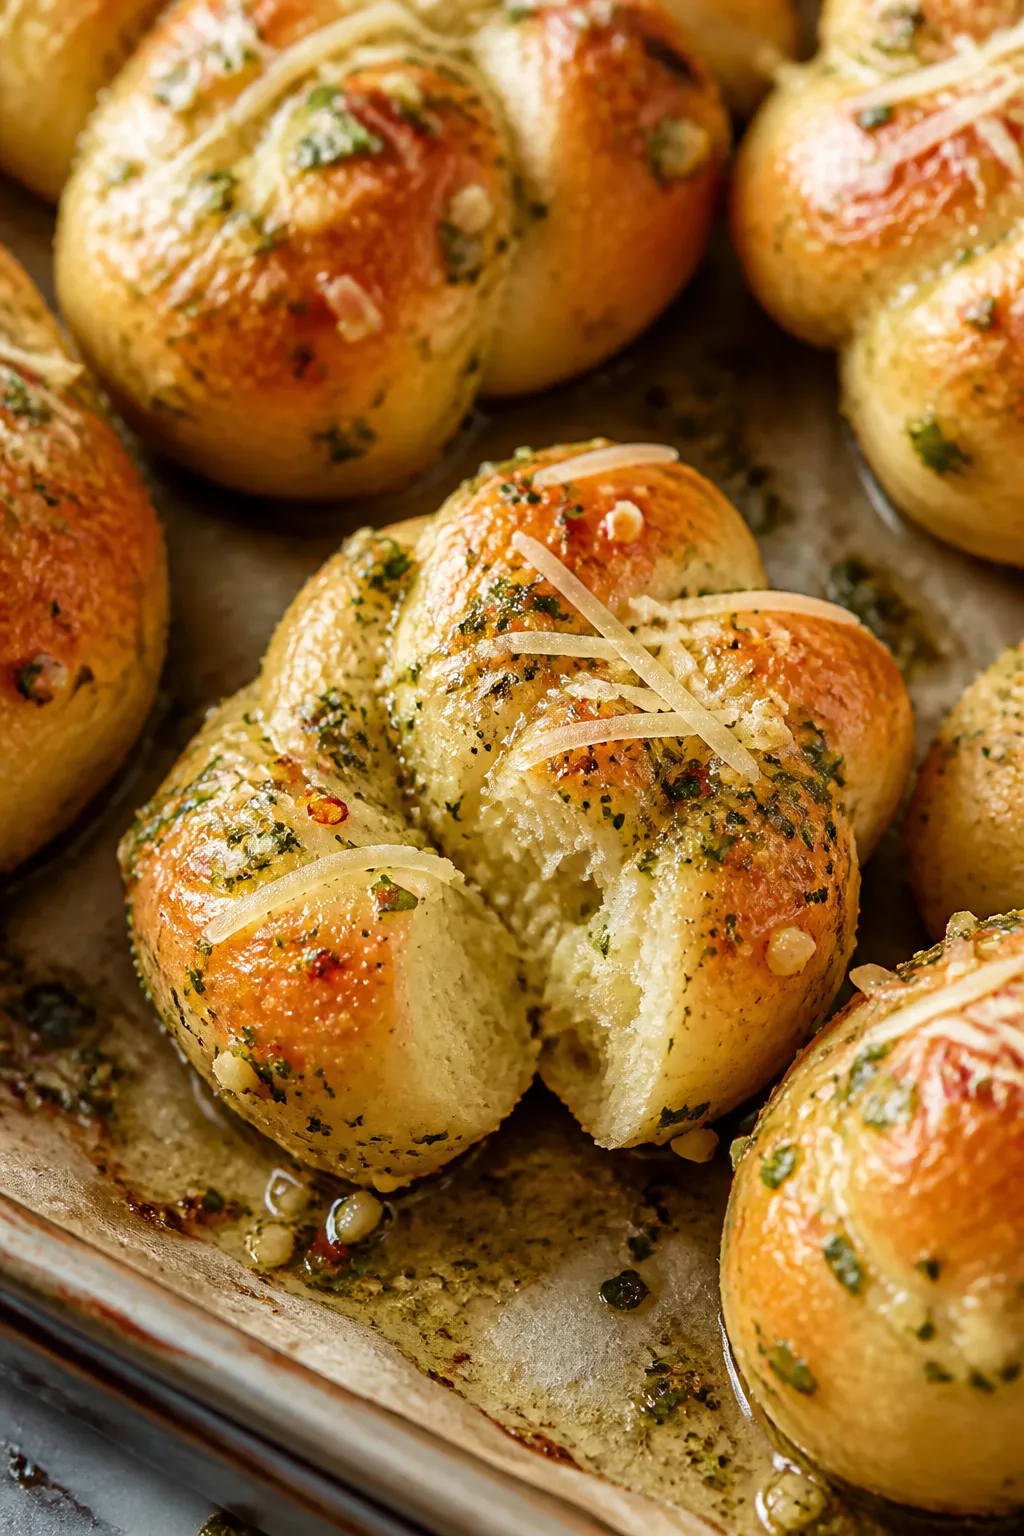
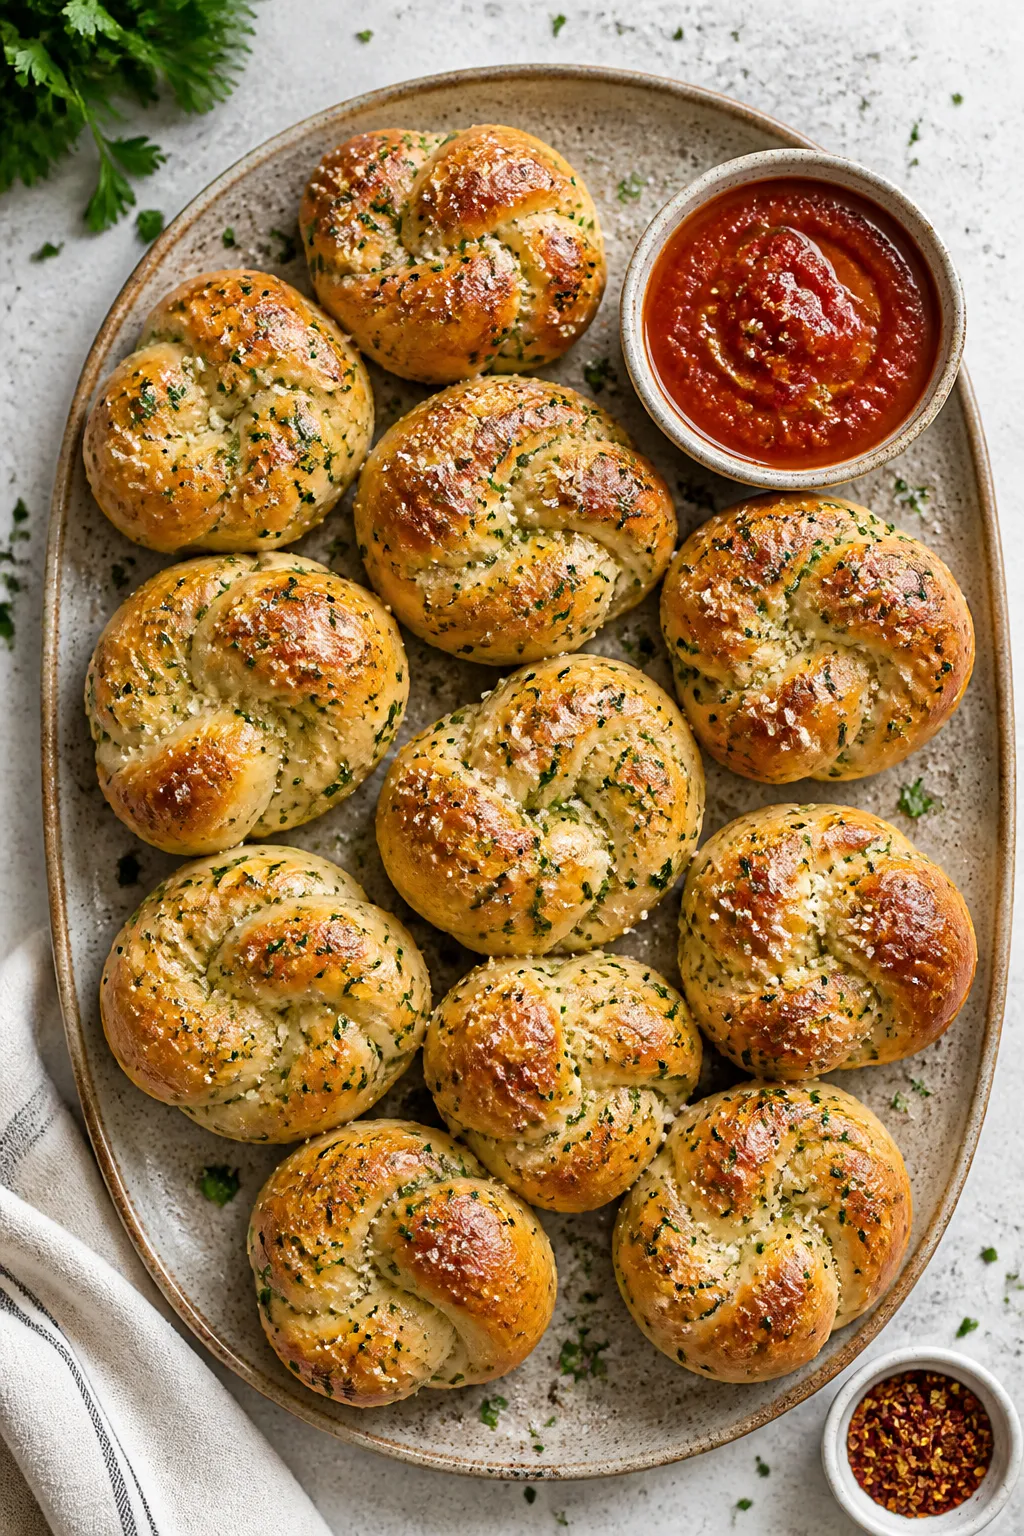
Cottage Cheese Garlic Knots – Soft, Savory, and Surprisingly Easy
Warm, buttery garlic knots are hard to resist, and this version brings a little twist with cottage cheese for extra tenderness and protein. They bake up soft inside with a lightly crisp, golden shell. The flavor is garlicky, herby, and just salty enough to make you reach for another.
Never wonder what's for dinner again.
Get 7 healthy, family-friendly dinners complete with recipes, grocery lists, and simple meal plans delivered straight to your inbox.
If you’ve only had garlic knots from a pizzeria, this homemade take will feel both familiar and fresh. You don’t need to be a baking pro—just a handful of pantry staples and a bit of time.
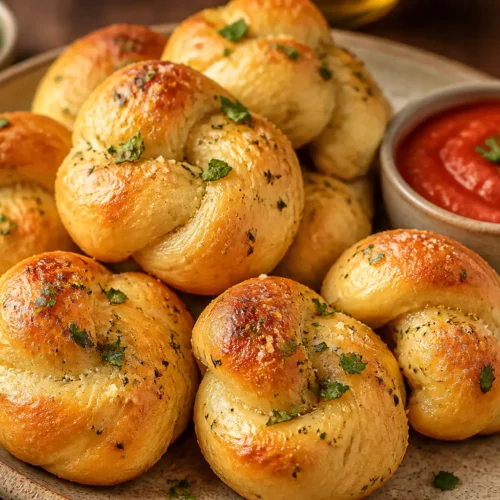
Cottage Cheese Garlic Knots - Soft, Savory, and Surprisingly Easy
Ingredients
- For the dough:
- 2 3/4 cups (330 g) all-purpose flour, plus extra for dusting
- 2 teaspoons instant yeast (or rapid-rise yeast)
- 1 tablespoon granulated sugar
- 1 teaspoon fine sea salt
- 3/4 cup (170 g) cottage cheese, small- or large-curd
- 1/2 cup (120 ml) warm water (about 105–115°F/40–46°C)
- 2 tablespoons olive oil
- 1 large egg, room temperature
- For the garlic butter:
- 3 tablespoons unsalted butter
- 1 tablespoon olive oil
- 3–4 cloves garlic, finely minced
- 2 tablespoons chopped fresh parsley (or 2 teaspoons dried)
- 1/4 teaspoon red pepper flakes (optional)
- 1/2 teaspoon kosher salt, plus more to taste
- Freshly grated Parmesan, for finishing (optional)
Instructions
- Blend the cottage cheese: Add cottage cheese to a food processor or blender and pulse until mostly smooth. This step helps it incorporate evenly and keeps the dough soft.
- Mix the dough: In a large bowl, whisk flour, instant yeast, sugar, and salt. In a separate bowl, whisk the blended cottage cheese, warm water, olive oil, and egg until smooth. Pour wet into dry and stir with a spatula until a shaggy dough forms.
- Knead until smooth: Turn dough onto a lightly floured surface and knead 6–8 minutes, adding only enough flour to prevent sticking. You want a soft, slightly tacky dough that springs back when pressed.
- First rise: Place dough in a lightly oiled bowl, cover, and let rise in a warm spot until doubled, about 60–75 minutes. If your kitchen is cool, it may take a bit longer.
- Prep the pan and oven: Line a baking sheet with parchment paper. Preheat oven to 400°F (200°C).
- Shape the knots: Turn risen dough onto a floured surface and pat into a rectangle. Cut into 12 equal strips. Roll each strip into a 9–10 inch rope, tie into a loose knot, and tuck the ends underneath. Place on the baking sheet, spaced slightly apart.
- Second rise: Cover loosely and let the knots puff for 20–25 minutes. They don’t need to double—just look slightly fuller.
- Make the garlic butter: While the knots proof, melt butter with olive oil in a small pan over low heat. Add garlic and cook 30–60 seconds until fragrant but not browned. Stir in parsley, red pepper flakes if using, and salt. Remove from heat.
- Brush and bake: Lightly brush the knots with half the garlic butter. Bake 12–15 minutes, until golden on top and cooked through.
- Finish and serve: Immediately brush with the remaining garlic butter. Sprinkle with Parmesan if you like. Serve warm with marinara or alongside your favorite meal.
What Makes This Special
- Extra tender dough: Cottage cheese adds moisture and a gentle richness without making the knots heavy.
- Higher protein: A simple swap that makes a snack or side feel more satisfying.
- Bold garlic-herb flavor: Butter, olive oil, garlic, and parsley coat every curve of the knot.
- Approachable for beginners: The dough is forgiving and easy to shape, even if you’re new to yeast breads.
- Versatile side: Serve with soup, salad, pasta, or as a game-day snack with marinara.
Ingredients
- For the dough:
- 2 3/4 cups (330 g) all-purpose flour, plus extra for dusting
- 2 teaspoons instant yeast (or rapid-rise yeast)
- 1 tablespoon granulated sugar
- 1 teaspoon fine sea salt
- 3/4 cup (170 g) cottage cheese, small- or large-curd
- 1/2 cup (120 ml) warm water (about 105–115°F/40–46°C)
- 2 tablespoons olive oil
- 1 large egg, room temperature
- For the garlic butter:
- 3 tablespoons unsalted butter
- 1 tablespoon olive oil
- 3–4 cloves garlic, finely minced
- 2 tablespoons chopped fresh parsley (or 2 teaspoons dried)
- 1/4 teaspoon red pepper flakes (optional)
- 1/2 teaspoon kosher salt, plus more to taste
- Freshly grated Parmesan, for finishing (optional)
Instructions
- Blend the cottage cheese: Add cottage cheese to a food processor or blender and pulse until mostly smooth. This step helps it incorporate evenly and keeps the dough soft.
- Mix the dough: In a large bowl, whisk flour, instant yeast, sugar, and salt.
In a separate bowl, whisk the blended cottage cheese, warm water, olive oil, and egg until smooth. Pour wet into dry and stir with a spatula until a shaggy dough forms.
- Knead until smooth: Turn dough onto a lightly floured surface and knead 6–8 minutes, adding only enough flour to prevent sticking. You want a soft, slightly tacky dough that springs back when pressed.
- First rise: Place dough in a lightly oiled bowl, cover, and let rise in a warm spot until doubled, about 60–75 minutes.
If your kitchen is cool, it may take a bit longer.
- Prep the pan and oven: Line a baking sheet with parchment paper. Preheat oven to 400°F (200°C).
- Shape the knots: Turn risen dough onto a floured surface and pat into a rectangle. Cut into 12 equal strips.
Roll each strip into a 9–10 inch rope, tie into a loose knot, and tuck the ends underneath. Place on the baking sheet, spaced slightly apart.
- Second rise: Cover loosely and let the knots puff for 20–25 minutes. They don’t need to double—just look slightly fuller.
- Make the garlic butter: While the knots proof, melt butter with olive oil in a small pan over low heat.
Add garlic and cook 30–60 seconds until fragrant but not browned. Stir in parsley, red pepper flakes if using, and salt. Remove from heat.
- Brush and bake: Lightly brush the knots with half the garlic butter.
Bake 12–15 minutes, until golden on top and cooked through.
- Finish and serve: Immediately brush with the remaining garlic butter. Sprinkle with Parmesan if you like. Serve warm with marinara or alongside your favorite meal.
How to Store
- Room temperature: Keep cooled knots in an airtight container for up to 2 days.
Rewarm at 325°F (165°C) for 6–8 minutes.
- Refrigerator: Store up to 4 days. Reheat in the oven or air fryer so they crisp up again.
- Freezer: Freeze baked, cooled knots in a zip-top bag for up to 2 months. Reheat from frozen at 325°F (165°C) for 10–12 minutes.
- Make-ahead dough: After the first rise, refrigerate dough up to 24 hours.
Bring to room temp, shape, proof, and bake.
Why This is Good for You
- More protein, more staying power: Cottage cheese bumps the protein, making these knots a more satisfying side or snack.
- Balanced indulgence: You still get buttery, garlicky flavor, but the dough’s added dairy keeps portions more filling, so you may feel satisfied with less.
- Wholesome ingredients: Simple pantry items—flour, olive oil, eggs, herbs—no mystery additives.
- Customizable: You can control sodium, butter, and toppings to match your needs.
What Not to Do
- Don’t skip blending the cottage cheese if it’s very chunky. Large curds can create uneven texture.
- Don’t over-flour the dough. Too much flour makes knots dense. Slight tackiness is fine.
- Don’t kill the yeast. Water hotter than 120°F (49°C) can harm yeast and stall your rise.
- Don’t overbake. Pull them when golden.
Dry knots lose their soft, tender pull.
- Don’t burn the garlic. Browned garlic turns bitter. Keep the heat low and gentle.
Variations You Can Try
- Herb garden: Swap parsley for basil, oregano, chives, or thyme—fresh or dried.
- Cheesy crust: Dust with grated Parmesan or Pecorino in the last 2 minutes of baking.
- Everything seasoning: Sprinkle with everything bagel seasoning right after brushing with butter.
- Lemon-garlic: Add 1 teaspoon lemon zest to the garlic butter for brightness.
- Whole wheat blend: Use 1 cup whole wheat flour + 1 3/4 cups all-purpose. Add 1–2 tablespoons extra water if needed.
- Spicy kick: Increase red pepper flakes, or finish with a drizzle of Calabrian chili oil.
- Stuffed knots: Wrap a small cube of mozzarella in the center of each rope before knotting.
FAQ
Can I use active dry yeast instead of instant?
Yes.
Activate 2 1/4 teaspoons active dry yeast in the warm water with the sugar for 5–10 minutes until foamy, then proceed. The rise times may be slightly longer.
Need More Easy Dinner Ideas?
Get my FREE 7-Day Easy Dinner Reset and enjoy a full week of healthy dinners without the meal-planning stress.
What kind of cottage cheese works best?
Either small- or large-curd works, but aim for 2% or full-fat for the best tenderness and flavor. Blend it briefly so it mixes smoothly into the dough.
Can I make these without eggs?
Yes.
Replace the egg with 3 tablespoons milk or additional cottage cheese plus 1 teaspoon olive oil. The texture will still be soft, though a bit less rich.
How do I know when the knots are done?
They should be lightly to medium golden on top and feel light when lifted. If you have a thermometer, the internal temp should read about 195–200°F (90–93°C).
Do I need a stand mixer?
No.
The dough is easy to mix by hand. A stand mixer with a dough hook will save effort, but it’s not required.
What if my dough is too sticky?
Dust the counter and your hands lightly with flour and knead a minute or two more. Add flour a teaspoon at a time as needed.
Avoid adding large amounts at once.
Can I make them vegan?
Use a plant-based cottage cheese alternative, replace the egg with 3 tablespoons plant milk, and swap the butter for olive oil or vegan butter. Flavor will shift slightly but still be delicious.
How can I re-crisp leftovers?
Warm them in a 350°F (175°C) oven or air fryer for 4–6 minutes. A quick brush of olive oil before reheating helps revive the crust.
Can I use garlic powder instead of fresh garlic?
Yes.
Use 1 teaspoon garlic powder in the butter mixture. Add it off the heat so it doesn’t scorch.
What can I serve with these?
They’re great with marinara, tomato soup, Caesar salad, roasted chicken, baked ziti, or a simple bowl of beans and greens.
Wrapping Up
Cottage Cheese Garlic Knots bring bakery warmth to your kitchen with a soft crumb, rich garlic butter, and a subtle protein boost. They’re easy enough for a weeknight and special enough for guests.
Keep a batch in the freezer for quick sides, and play with herbs and toppings to make them your own. Once you’ve tried them fresh from the oven, they’ll become a regular on your table.
Printable Recipe Card
Want just the essential recipe details without scrolling through the article? Get our printable recipe card with just the ingredients and instructions.
Loved This Recipe?
If you're looking for more simple, healthy dinners your family will actually eat, grab my FREE 7-Day Easy Dinner Reset. You'll get 7 easy dinner recipes, simple grocery lists, and a done-for-you plan that takes the stress out of mealtime.