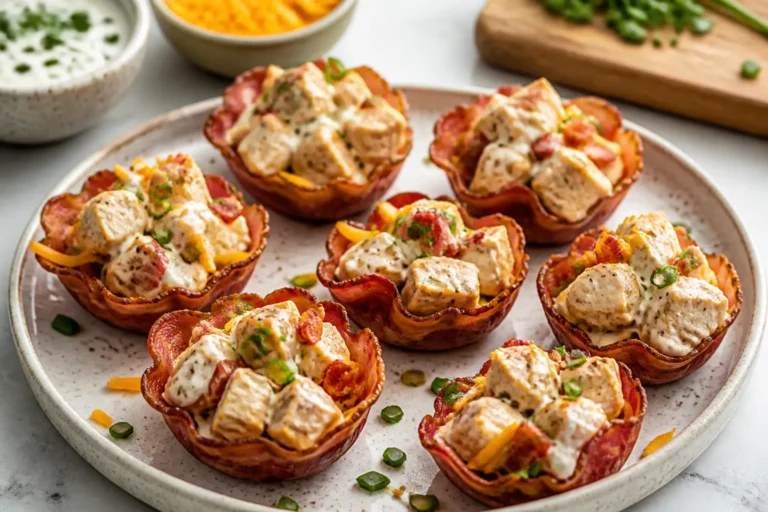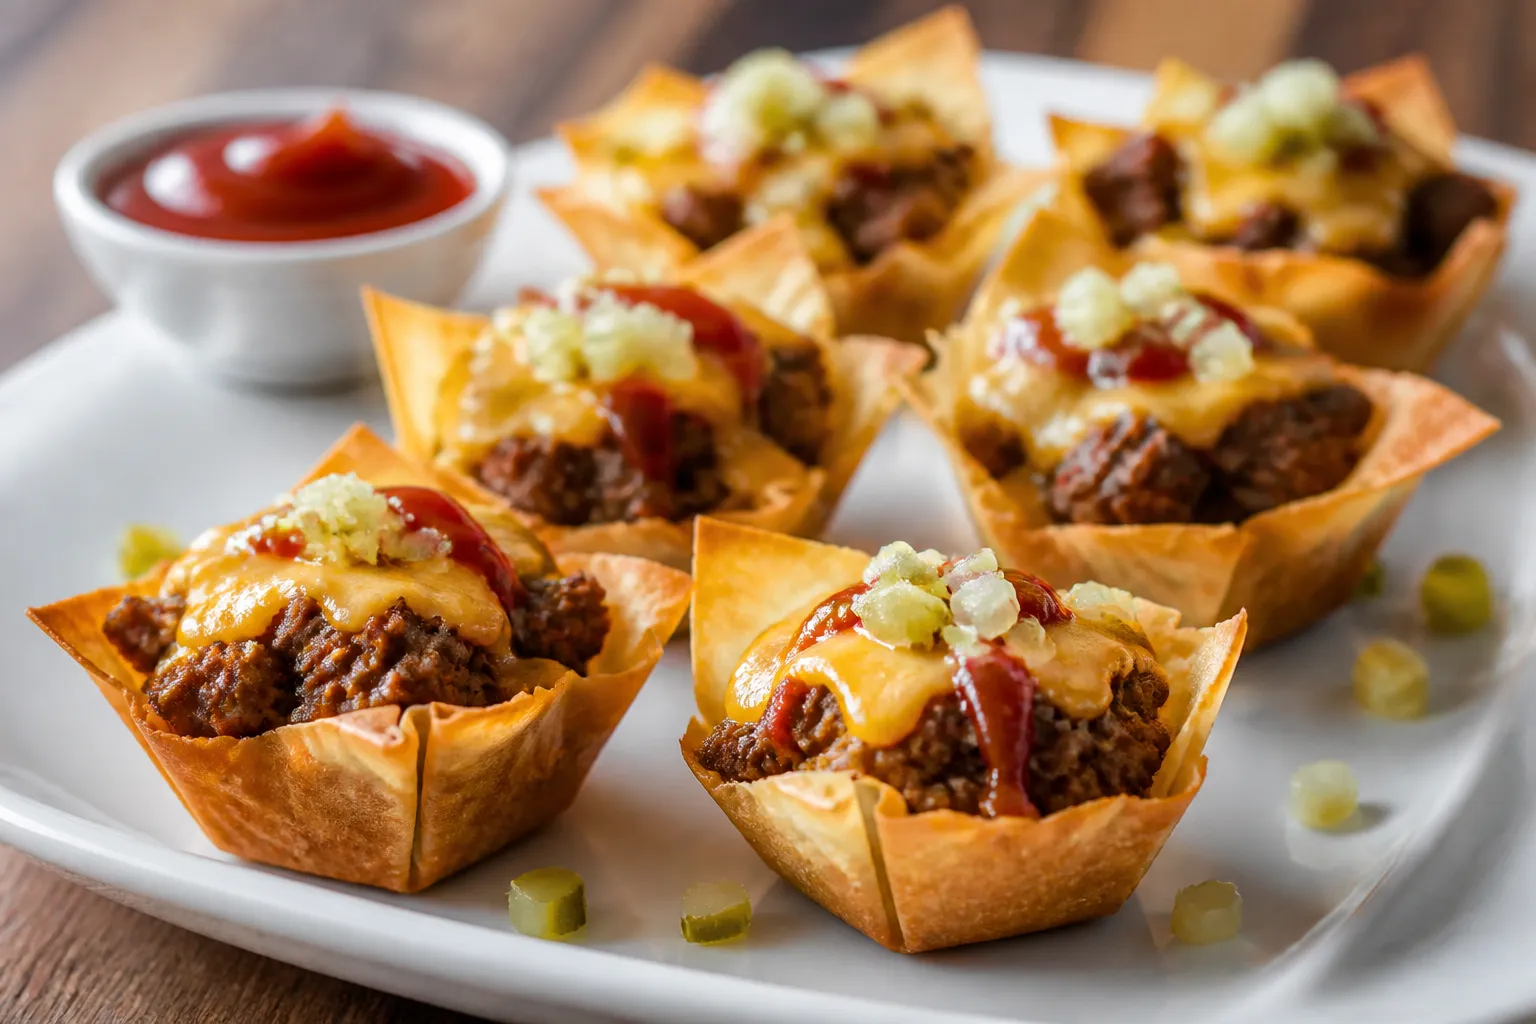
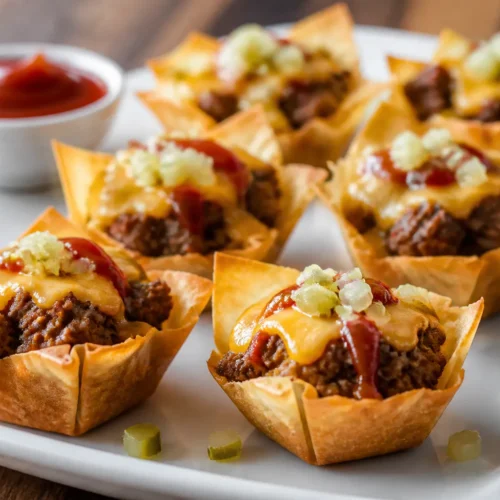
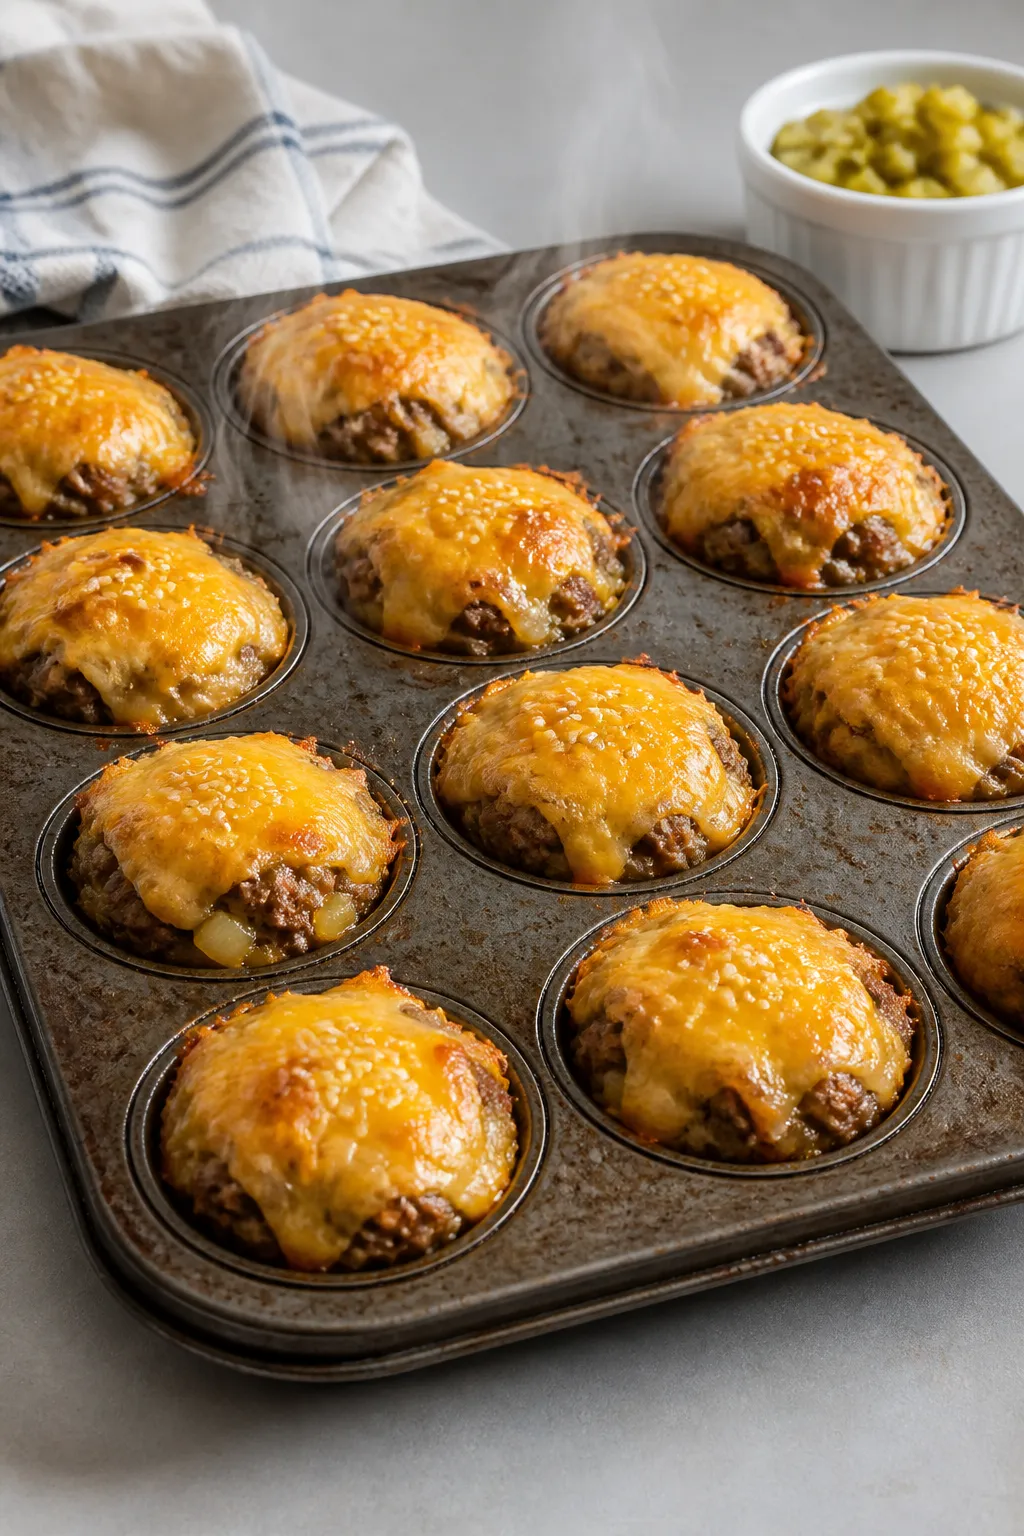
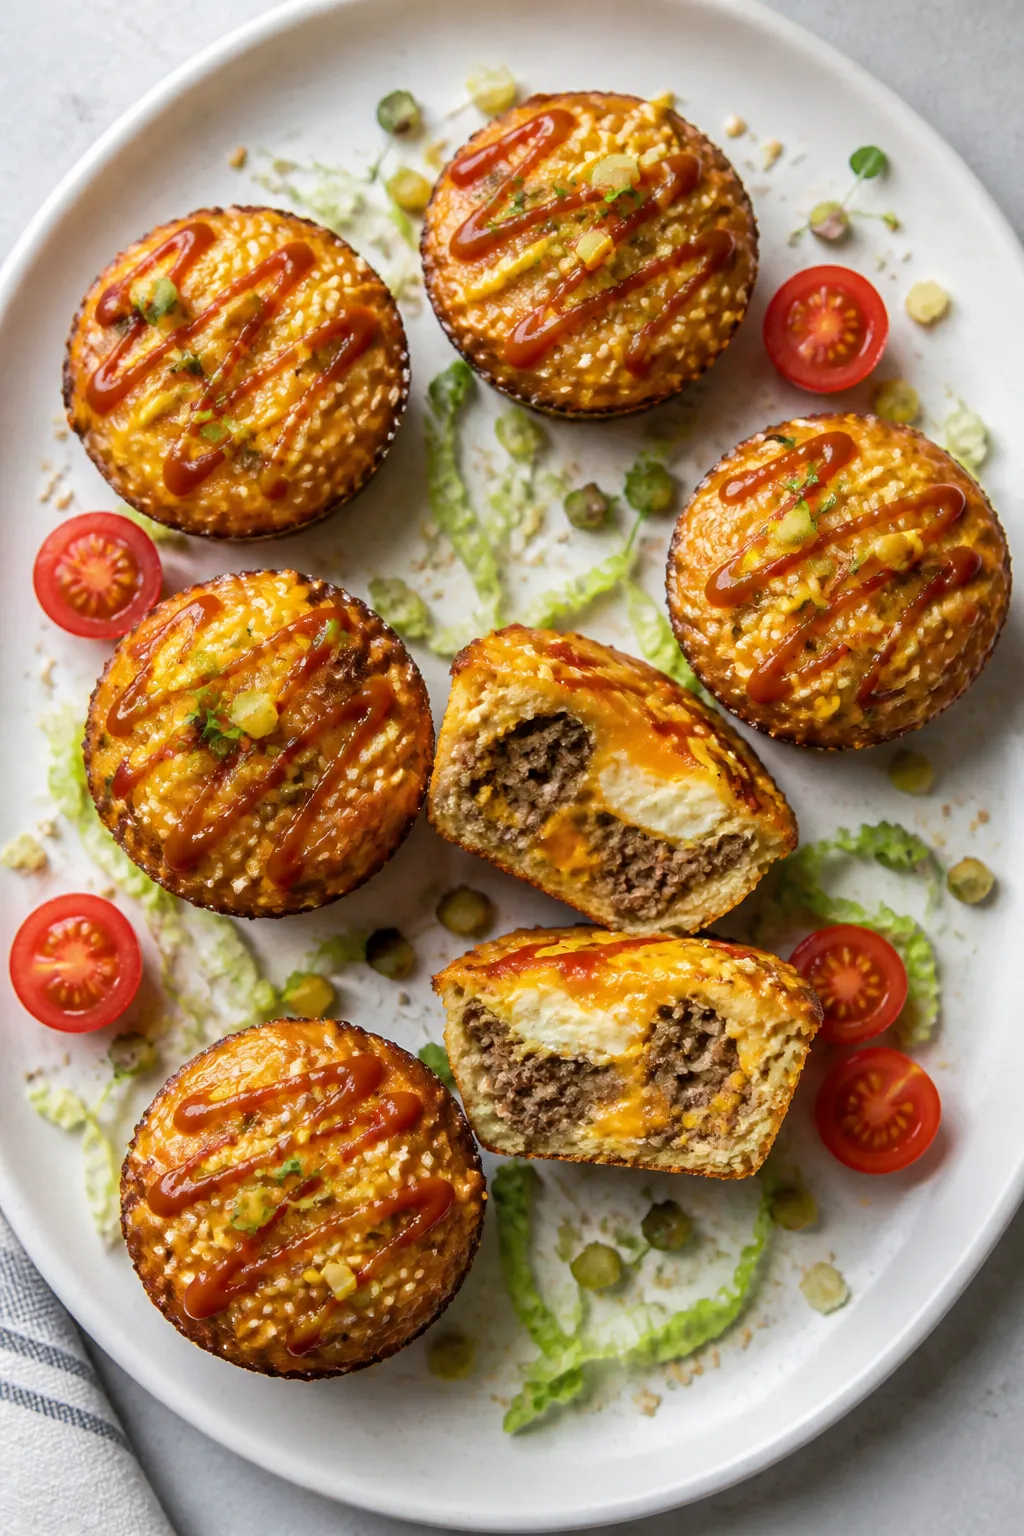
High Protein Cheeseburger Snack Cups – A Satisfying, Portable Bite
These snack cups pack all the flavor of a classic cheeseburger into a tidy, high-protein bite. They’re easy to prep, simple to reheat, and perfect for busy days when you want something tasty and filling. Think juicy ground beef, melted cheese, and a few smart add-ins baked into individual muffin cups.
Never wonder what's for dinner again.
Get 7 healthy, family-friendly dinners complete with recipes, grocery lists, and simple meal plans delivered straight to your inbox.
You can eat them warm or cold, toss them in a lunchbox, or grab one after a workout. If you love cheeseburgers but want something lighter and more convenient, this is your new go-to.
High Protein Cheeseburger Snack Cups - A Satisfying, Portable Bite
Ingredients
- Lean ground beef (90–96% lean), about 1 pound
- Eggs (2 large) and egg whites (1/2 cup) for binding and protein
- Shredded cheddar or reduced-fat cheddar, about 1 cup
- Plain Greek yogurt (1/4 cup) or light cream cheese for moisture
- Yellow onion, finely diced (1 small)
- Pickles, finely chopped (1/4 cup), plus extra for topping
- Ketchup (2 tablespoons)
- Mustard (1 tablespoon; yellow or Dijon)
- Worcestershire sauce (1 teaspoon) for depth
- Garlic powder (1 teaspoon)
- Onion powder (1/2 teaspoon)
- Salt and black pepper to taste
- Avocado oil or olive oil spray for the pan
- Optional toppings: sesame seeds, shredded lettuce, cherry tomato halves, extra cheese, hot sauce
Instructions
- Preheat and prep: Heat your oven to 375°F (190°C). Lightly spray a standard 12-cup muffin tin with oil, or use silicone liners for easy release.
- Sauté the aromatics: Warm a skillet over medium heat. Add a small splash of oil, then the diced onion. Cook 3–4 minutes until soft and lightly golden.
- Brown the beef: Add the ground beef to the skillet. Break it up with a spatula and cook until browned, about 5–7 minutes. Season with salt, pepper, garlic powder, and onion powder. Drain any excess fat if needed.
- Flavor boost: Stir in ketchup, mustard, Worcestershire, and chopped pickles. Let it simmer for 1–2 minutes to meld flavors. Remove from heat and cool for a couple of minutes so it doesn’t scramble the eggs later.
- Mix the binder: In a large bowl, whisk eggs, egg whites, and Greek yogurt until smooth. Fold in half of the shredded cheese.
- Combine: Add the slightly cooled beef mixture to the egg-cheese mixture. Stir just until evenly combined.
- Fill the cups: Divide the mixture evenly among the 12 muffin wells, about three-quarters full. Sprinkle the remaining cheese over the tops. Add a pinch of sesame seeds if you like a “burger bun” vibe.
- Bake: Place in the oven and bake 15–18 minutes, until the centers are set and the tops are golden. A toothpick should come out mostly clean.
- Rest and release: Let the cups cool in the pan for 5 minutes, then gently run a knife around the edges and lift them out. Cooling helps them firm up and hold their shape.
- Garnish and serve: Top with extra chopped pickles, a small drizzle of ketchup or mustard, or a few shreds of lettuce and a cherry tomato half. Serve warm or at room temp.
What Makes This Special
High Protein Cheeseburger Snack Cups focus on lean protein and smart fat without the heavy bun. They deliver cheeseburger flavor in a form that’s meal-prep friendly and portion-controlled.
Each cup can clock in with a generous amount of protein, especially if you use lean beef, egg whites, and a high-protein cheese.
They also adapt well to different diets. You can keep them low-carb, gluten-free, or even dairy-free with a few swaps. Best of all, they’re kid-friendly and freezer-friendly, making them an easy win for most households.
Shopping List
- Lean ground beef (90–96% lean), about 1 pound
- Eggs (2 large) and egg whites (1/2 cup) for binding and protein
- Shredded cheddar or reduced-fat cheddar, about 1 cup
- Plain Greek yogurt (1/4 cup) or light cream cheese for moisture
- Yellow onion, finely diced (1 small)
- Pickles, finely chopped (1/4 cup), plus extra for topping
- Ketchup (2 tablespoons)
- Mustard (1 tablespoon; yellow or Dijon)
- Worcestershire sauce (1 teaspoon) for depth
- Garlic powder (1 teaspoon)
- Onion powder (1/2 teaspoon)
- Salt and black pepper to taste
- Avocado oil or olive oil spray for the pan
- Optional toppings: sesame seeds, shredded lettuce, cherry tomato halves, extra cheese, hot sauce
Step-by-Step Instructions
- Preheat and prep: Heat your oven to 375°F (190°C).
Lightly spray a standard 12-cup muffin tin with oil, or use silicone liners for easy release.
- Sauté the aromatics: Warm a skillet over medium heat. Add a small splash of oil, then the diced onion. Cook 3–4 minutes until soft and lightly golden.
- Brown the beef: Add the ground beef to the skillet.
Break it up with a spatula and cook until browned, about 5–7 minutes. Season with salt, pepper, garlic powder, and onion powder. Drain any excess fat if needed.
- Flavor boost: Stir in ketchup, mustard, Worcestershire, and chopped pickles.
Let it simmer for 1–2 minutes to meld flavors. Remove from heat and cool for a couple of minutes so it doesn’t scramble the eggs later.
- Mix the binder: In a large bowl, whisk eggs, egg whites, and Greek yogurt until smooth. Fold in half of the shredded cheese.
- Combine: Add the slightly cooled beef mixture to the egg-cheese mixture.
Stir just until evenly combined.
- Fill the cups: Divide the mixture evenly among the 12 muffin wells, about three-quarters full. Sprinkle the remaining cheese over the tops. Add a pinch of sesame seeds if you like a “burger bun” vibe.
- Bake: Place in the oven and bake 15–18 minutes, until the centers are set and the tops are golden.
A toothpick should come out mostly clean.
- Rest and release: Let the cups cool in the pan for 5 minutes, then gently run a knife around the edges and lift them out. Cooling helps them firm up and hold their shape.
- Garnish and serve: Top with extra chopped pickles, a small drizzle of ketchup or mustard, or a few shreds of lettuce and a cherry tomato half. Serve warm or at room temp.
Keeping It Fresh
Store cooled snack cups in an airtight container in the fridge for up to 4 days.
For best texture, reheat in a toaster oven or standard oven at 325°F (165°C) for 6–8 minutes. The microwave works in a pinch (30–45 seconds), but expect a softer texture.
They also freeze well. Wrap each cup tightly or place them in a single layer in a freezer-safe bag.
Freeze for up to 2 months. Thaw overnight in the fridge, then reheat as above. If reheating from frozen, add a couple of extra minutes.
Health Benefits
- High-quality protein: Lean beef, eggs, and Greek yogurt provide complete proteins that support muscle repair and satiety.
- Lower carb option: Skipping the bun keeps carbs moderate, which helps with blood sugar balance and appetite control.
- Micronutrient boost: Beef offers iron, zinc, and B12; eggs add choline; dairy contributes calcium.
- Portion control: Individual cups make it easier to manage calories and macros without guesswork.
Pitfalls to Watch Out For
- Overcooking: Too long in the oven leads to dry, rubbery cups.
Pull them as soon as the centers set.
- Too much fat: If using fattier beef, drain well. Excess grease can make cups collapse or feel heavy.
- Skipping the binder: Egg whites and yogurt help hold structure. Without them, the cups may crumble.
- Big chunks: Finely dice onion and pickles.
Large pieces can cause gaps and uneven texture.
Recipe Variations
- Turkey or chicken: Swap in 93–99% lean ground turkey or chicken. Add an extra teaspoon of olive oil if very lean to prevent dryness.
- Dairy-free: Use a dairy-free shredded cheese and swap Greek yogurt for a plain, unsweetened coconut or almond yogurt.
- Bacon cheeseburger: Stir in 2–3 strips of cooked, crumbled turkey bacon for smoky flavor.
- Spicy: Add diced jalapeños, a dash of hot sauce, or pepper jack cheese.
- Veggie-loaded: Fold in finely chopped mushrooms or bell pepper (pre-sautéed to remove moisture) for extra volume and fiber.
- Big Mac style: Add a touch of thousand island dressing as a drizzle on top after baking and extra sesame seeds.
Need More Easy Dinner Ideas?
Get my FREE 7-Day Easy Dinner Reset and enjoy a full week of healthy dinners without the meal-planning stress.
FAQ
How much protein is in each cup?
It varies by ingredients, but a typical cup made with lean beef, egg whites, and reduced-fat cheddar lands around 10–13 grams of protein. Exact numbers depend on your specific brands and portion sizes.
Can I make these without a muffin pan?
Yes.
Bake the mixture in an 8×8-inch pan lined with parchment, then slice into squares once set. You may need to add a few minutes to the bake time.
Do I need to pre-cook the beef?
Absolutely. Browning the beef first ensures safe cooking and better flavor.
It also lets you drain any excess fat before baking.
What cheese works best?
Cheddar melts well and tastes classic. You can also try Monterey Jack, pepper jack, or a reduced-fat blend. Avoid very aged cheeses that don’t melt smoothly.
Can I make them egg-free?
Eggs are key for structure here.
An egg substitute may work, but texture will differ. If you try it, use a commercial egg replacer and add a spoonful of almond flour for stability.
Why did my cups shrink or sink?
Likely overbaking or too much residual fat. Be sure to drain cooked beef, avoid overmixing, and pull them as soon as they’re set.
Letting them cool briefly in the pan also helps.
How do I keep them from sticking?
Use silicone liners or thoroughly spray the muffin tin. Let the cups rest a few minutes after baking and run a thin knife around the edges before removing.
Are they good cold?
Yes. They’re tasty straight from the fridge, which makes them convenient for on-the-go snacks or lunch boxes.
In Conclusion
High Protein Cheeseburger Snack Cups give you the flavor and satisfaction of a cheeseburger in a smart, portable package.
They’re easy to make, easy to store, and endlessly customizable. Whether you’re feeding a family, hitting protein goals, or just want a better snack, these cups check all the boxes. Keep a batch in the fridge, and you’ll always have a savory, satisfying bite ready to go.
Printable Recipe Card
Want just the essential recipe details without scrolling through the article? Get our printable recipe card with just the ingredients and instructions.
Loved This Recipe?
If you're looking for more simple, healthy dinners your family will actually eat, grab my FREE 7-Day Easy Dinner Reset. You'll get 7 easy dinner recipes, simple grocery lists, and a done-for-you plan that takes the stress out of mealtime.