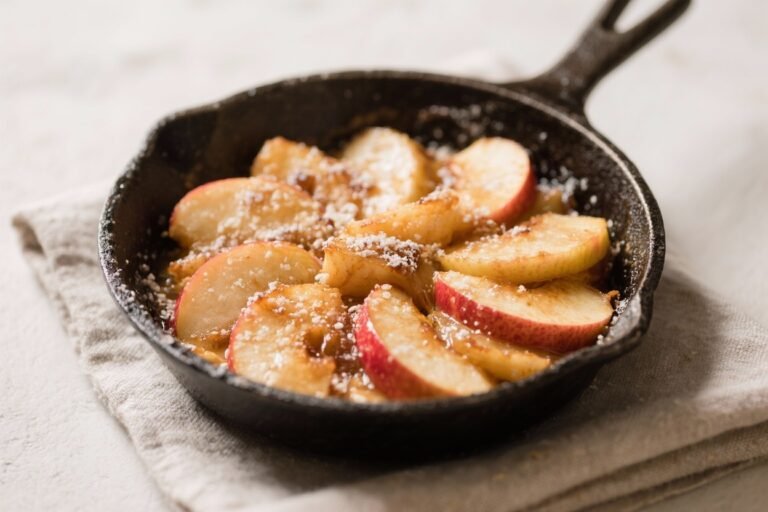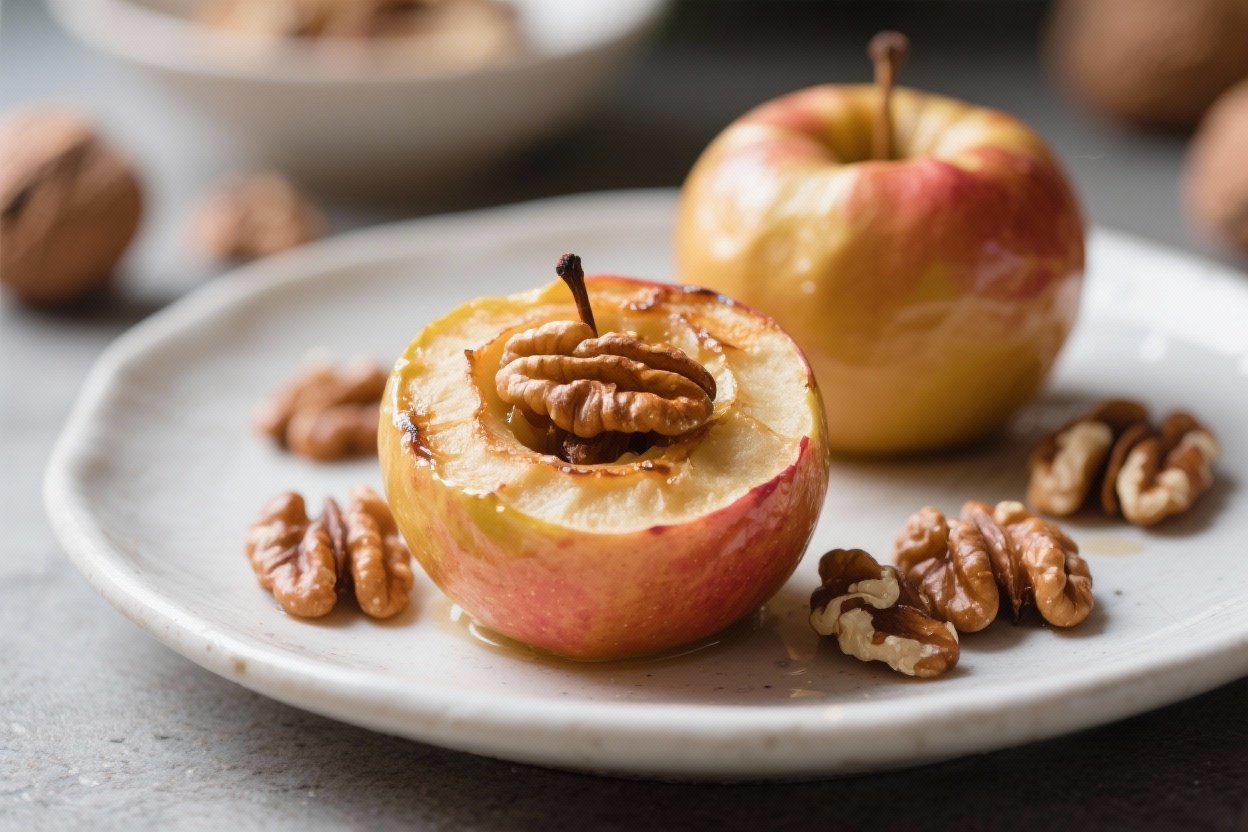
Simple Baked Apples With Walnuts – Cozy, Comforting, and Easy
Warm baked apples are one of those desserts that feel like a hug. They’re sweet, soft, and comforting, with just enough texture from the nuts to keep each bite interesting. This version is easy enough for a weeknight but feels special enough for company.
Never wonder what's for dinner again.
Get 7 healthy, family-friendly dinners complete with recipes, grocery lists, and simple meal plans delivered straight to your inbox.
No fancy techniques, no special equipment—just straightforward ingredients and a reliable method. If you love the smell of cinnamon in the oven and a dessert that’s not too heavy, this one will hit the spot.
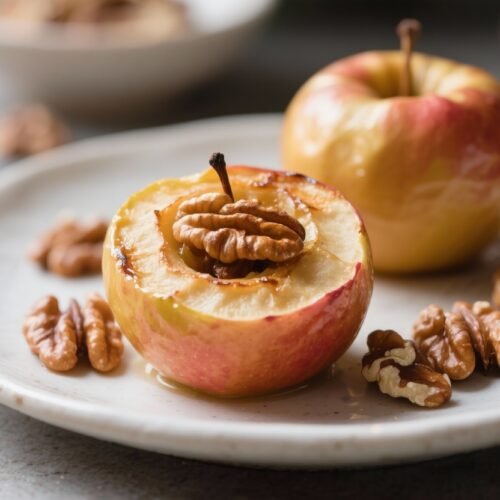
Simple Baked Apples With Walnuts - Cozy, Comforting, and Easy
Ingredients
- Apples (4 medium, firm baking apples like Honeycrisp, Braeburn, Pink Lady, or Granny Smith)
- Walnuts (1/2 cup, chopped)
- Brown sugar (2–3 tablespoons; adjust to taste)
- Cinnamon (1 teaspoon)
- Nutmeg (a pinch; optional)
- Salt (a small pinch to balance sweetness)
- Butter (2 tablespoons, cut into small pieces; use plant-based butter if dairy-free)
- Vanilla extract (1/2 teaspoon; optional for aroma)
- Honey or maple syrup (1–2 tablespoons, optional for drizzling)
- Water or apple cider (1/2 cup for the baking dish)
- Lemon juice (1 teaspoon to brighten flavors; optional)
- Optional toppings: vanilla ice cream, whipped cream, Greek yogurt, or a splash of heavy cream
Instructions
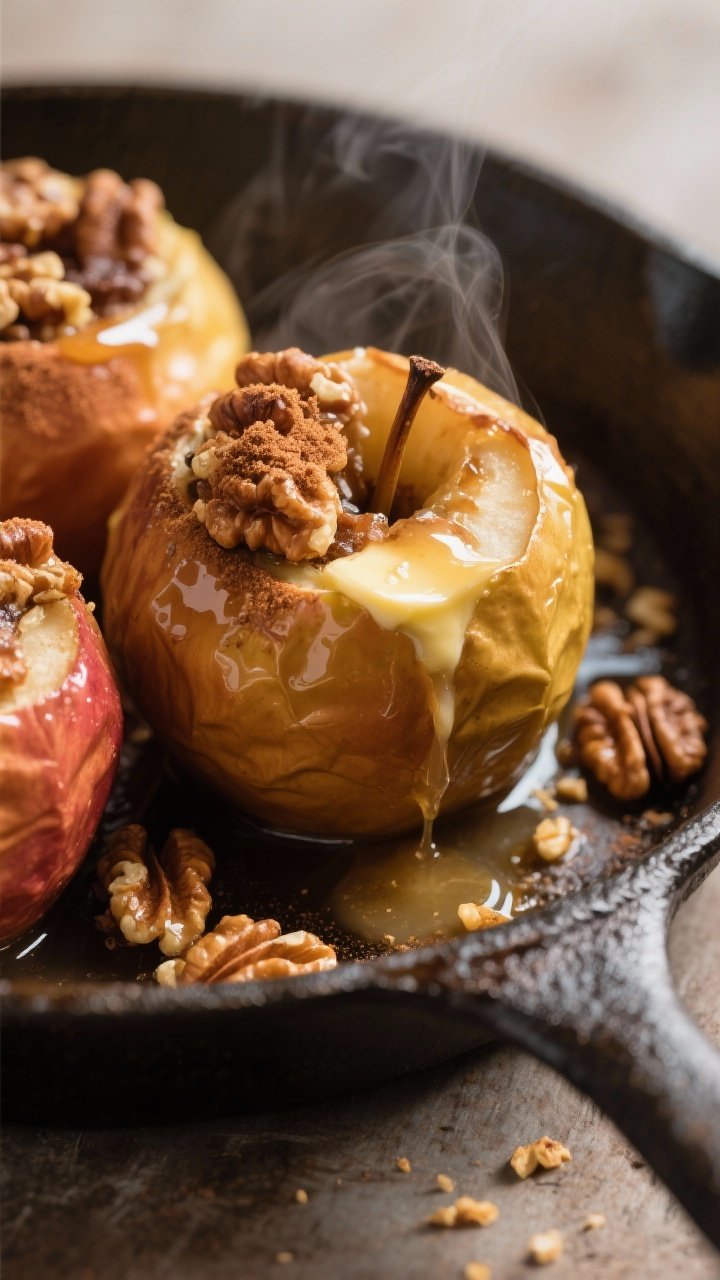
- Preheat the oven. Set your oven to 375°F (190°C). Lightly butter a small baking dish or use a snug oven-safe skillet.
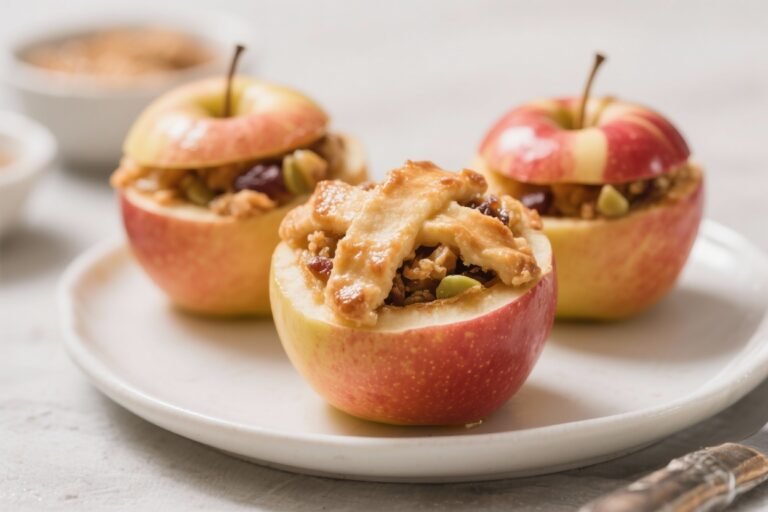
- Prep the apples. Wash and core the apples using an apple corer or a small paring knife. Leave the bottoms intact so the filling doesn’t fall through. If the apples wobble, slice a thin sliver off the bottom to help them stand upright.
- Make the walnut filling. In a small bowl, mix chopped walnuts, brown sugar, cinnamon, a pinch of nutmeg, and a pinch of salt. Stir in vanilla extract if using. Taste and adjust sweetness.
- Stuff the apples. Spoon the walnut mixture into each apple cavity and gently pack it in. Dot the tops with small pieces of butter. If you like extra shine and sweetness, drizzle a little honey or maple syrup over the stuffing.
- Add liquid to the dish. Pour water or apple cider into the baking dish around the apples. This helps steam them and creates a light sauce at the bottom.
- Bake. Cover the dish loosely with foil and bake for 20 minutes. Remove the foil and continue baking for another 15–25 minutes, until the apples are tender but not collapsing. Total time will vary depending on apple variety and size.
- Check doneness. Pierce an apple with a knife or skewer. It should slide in easily with slight resistance near the skin. If it’s still firm, keep baking in 5-minute increments.
- Finish with brightness. After baking, spoon some of the pan juices over the apples. Add a tiny splash of lemon juice to the pan juices if you want a brighter flavor contrast.
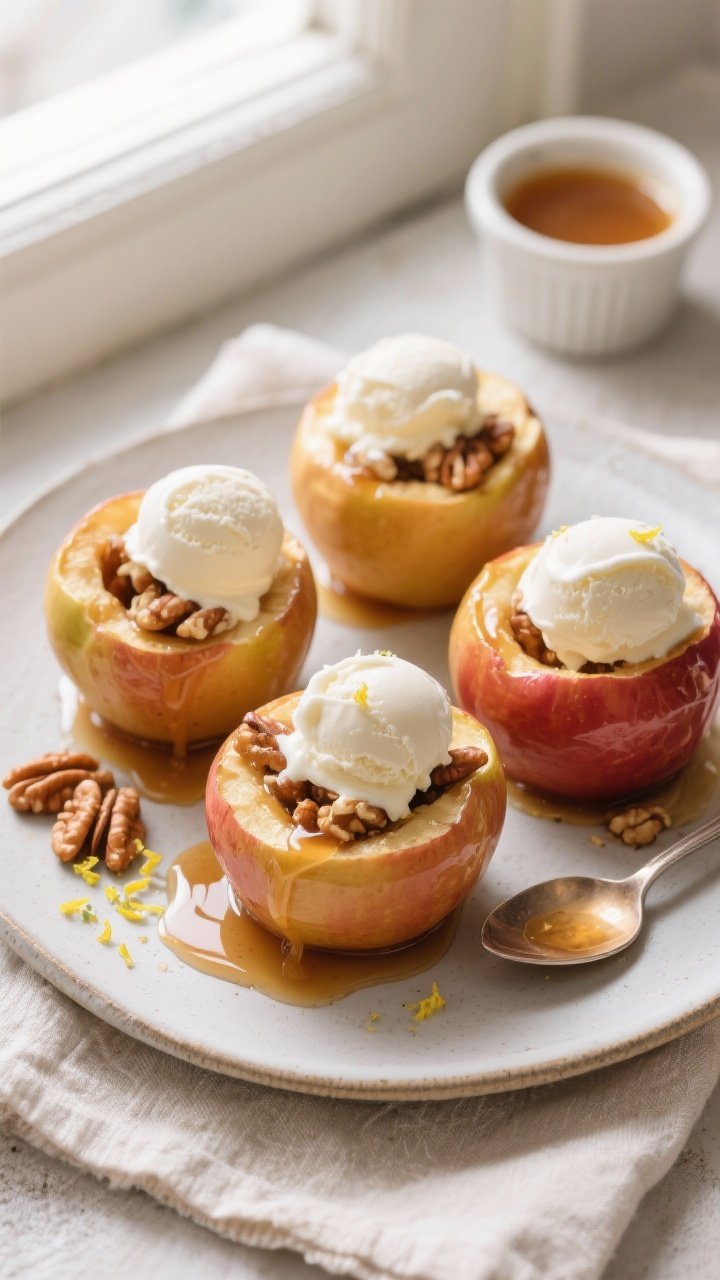
- Serve. Enjoy warm. Top with ice cream, whipped cream, Greek yogurt, or a drizzle of cream. A little extra cinnamon on top never hurts.
What Makes This Special
There’s beauty in simple desserts, and this one proves it. You get the natural sweetness of apples enhanced with warm spices and crunchy walnuts, all baked until tender.
It’s the kind of dessert that works on a chilly evening, after a family dinner, or as a cozy treat for two. Serve it plain, with a splash of cream, or topped with a scoop of vanilla ice cream for a little extra comfort.
It’s also flexible. You can swap in different nuts, use maple syrup instead of honey, or add a handful of dried fruit.
The recipe is forgiving and still delivers that baked-apple goodness with very little effort.
Shopping List
- Apples (4 medium, firm baking apples like Honeycrisp, Braeburn, Pink Lady, or Granny Smith)
- Walnuts (1/2 cup, chopped)
- Brown sugar (2–3 tablespoons; adjust to taste)
- Cinnamon (1 teaspoon)
- Nutmeg (a pinch; optional)
- Salt (a small pinch to balance sweetness)
- Butter (2 tablespoons, cut into small pieces; use plant-based butter if dairy-free)
- Vanilla extract (1/2 teaspoon; optional for aroma)
- Honey or maple syrup (1–2 tablespoons, optional for drizzling)
- Water or apple cider (1/2 cup for the baking dish)
- Lemon juice (1 teaspoon to brighten flavors; optional)
- Optional toppings: vanilla ice cream, whipped cream, Greek yogurt, or a splash of heavy cream
How to Make It
- Preheat the oven. Set your oven to 375°F (190°C). Lightly butter a small baking dish or use a snug oven-safe skillet.
- Prep the apples. Wash and core the apples using an apple corer or a small paring knife. Leave the bottoms intact so the filling doesn’t fall through.
If the apples wobble, slice a thin sliver off the bottom to help them stand upright.
- Make the walnut filling. In a small bowl, mix chopped walnuts, brown sugar, cinnamon, a pinch of nutmeg, and a pinch of salt. Stir in vanilla extract if using. Taste and adjust sweetness.
- Stuff the apples. Spoon the walnut mixture into each apple cavity and gently pack it in.
Dot the tops with small pieces of butter. If you like extra shine and sweetness, drizzle a little honey or maple syrup over the stuffing.
- Add liquid to the dish. Pour water or apple cider into the baking dish around the apples. This helps steam them and creates a light sauce at the bottom.
- Bake. Cover the dish loosely with foil and bake for 20 minutes.
Remove the foil and continue baking for another 15–25 minutes, until the apples are tender but not collapsing. Total time will vary depending on apple variety and size.
- Check doneness. Pierce an apple with a knife or skewer. It should slide in easily with slight resistance near the skin.
If it’s still firm, keep baking in 5-minute increments.
- Finish with brightness. After baking, spoon some of the pan juices over the apples. Add a tiny splash of lemon juice to the pan juices if you want a brighter flavor contrast.
- Serve. Enjoy warm. Top with ice cream, whipped cream, Greek yogurt, or a drizzle of cream.
A little extra cinnamon on top never hurts.
Storage Instructions
Let leftovers cool to room temperature, then store in an airtight container in the refrigerator for up to 3 days. Reheat gently in the microwave or in a 325°F (165°C) oven until warm, adding a spoonful of water or cider to keep them moist. For longer storage, you can freeze baked apples for up to 2 months.
Thaw in the fridge overnight and reheat as above. Keep in mind the texture will be softer after freezing.
Benefits of This Recipe
- Simple ingredients: Everything’s easy to find, and you may already have most of it.
- Naturally comforting: Warm spices, tender fruit, and a bit of crunch make a cozy, satisfying dessert.
- Flexible sweetness: You control the sugar. Use honey, maple, or reduce the brown sugar if you prefer.
- Texture balance: Walnuts add crunch and richness, pairing nicely with soft baked apples.
- Great for guests: Looks lovely and smells amazing with very little effort.
- Easy to scale: Make two apples for a quiet night or a full pan for a crowd.
Pitfalls to Watch Out For
- Choosing the wrong apple: Very soft apples (like McIntosh) can collapse.
Pick firm baking varieties for better shape.
- Overbaking: If they bake too long, they’ll split and turn mushy. Start checking earlier than you think.
- Dry pan: No liquid means the apples can scorch. Always add water or cider to the dish.
- Too much stuffing: Overpacking can crack the apples.
Fill gently and leave a little space at the top.
- Skipping salt: A tiny pinch makes the flavors pop and keeps the sweetness balanced.
Alternatives
- Nut swaps: Use pecans, almonds, or hazelnuts instead of walnuts. For nut-free, try toasted pumpkin or sunflower seeds.
- Sweeteners: Replace brown sugar with maple syrup, honey, or coconut sugar. Use less if your apples are very sweet.
- Add-ins: Stir in raisins, chopped dates, or dried cranberries.
A little orange zest is lovely, too.
- Spice variations: Try cardamom, allspice, or ginger. A touch of clove goes a long way—use sparingly.
- Dairy-free: Use coconut oil or plant-based butter in place of butter.
- Grain topping: Mix oats with the nut filling for a mini crisp-style texture.
- Sauce ideas: Serve with warm caramel, a dollop of yogurt sweetened with honey, or a spoonful of crème fraîche.
FAQ
What are the best apples for baking?
Choose firm apples that hold their shape, such as Honeycrisp, Braeburn, Pink Lady, or Granny Smith. They bake tender without turning mushy and have a good sweet-tart balance.
Need More Easy Dinner Ideas?
Get my FREE 7-Day Easy Dinner Reset and enjoy a full week of healthy dinners without the meal-planning stress.
Do I have to peel the apples?
No.
Leave the peel on to help the apples hold their shape. The skin softens in the oven and adds color and a bit of structure.
Can I make these ahead?
Yes. You can core and stuff the apples a few hours ahead, then refrigerate them tightly covered.
Bake just before serving. If fully baked ahead, reheat gently and spoon pan juices over the top to refresh them.
How do I keep them from collapsing?
Use firm apples, avoid overstuffing, and bake just until tender. Adding liquid to the pan also helps cook them evenly without drying out.
Can I make this without nuts?
Absolutely.
Use toasted pumpkin or sunflower seeds, or skip the crunch and add oats for texture. You can also increase the raisins or other dried fruit.
Is there a way to reduce the sugar?
Yes. Cut the brown sugar in half or rely mostly on maple syrup or honey.
If your apples are naturally sweet, you may find you need very little added sugar at all.
What should I serve with baked apples?
Vanilla ice cream is classic. Whipped cream, Greek yogurt, or a drizzle of heavy cream also pair beautifully. For a light option, serve with a spoonful of unsweetened yogurt and a dusting of cinnamon.
Can I use a microwave or air fryer?
In a pinch, you can microwave a stuffed apple for 3–5 minutes until tender, though the texture will be softer.
An air fryer at 350°F (175°C) works well, usually in 12–18 minutes, but check often to avoid splitting.
What if I don’t have an apple corer?
Use a small paring knife to carefully cut around the core, then scoop it out with a spoon. Keep the bottom intact so the filling stays in place.
How do I make a quick sauce?
Reduce the pan juices in a small skillet with a splash of cider or a knob of butter until slightly syrupy. Spoon over the apples right before serving for extra gloss and flavor.
Final Thoughts
Simple Baked Apples with Walnuts is the kind of recipe you keep in your back pocket.
It’s easy, reliable, and adaptable to whatever you have on hand. The result smells amazing, tastes cozy, and never feels heavy. Whether you’re cooking for yourself or setting out a warm dessert for friends, this one delivers comfort with minimal effort—and that’s always a win.
Printable Recipe Card
Want just the essential recipe details without scrolling through the article? Get our printable recipe card with just the ingredients and instructions.
Loved This Recipe?
If you're looking for more simple, healthy dinners your family will actually eat, grab my FREE 7-Day Easy Dinner Reset. You'll get 7 easy dinner recipes, simple grocery lists, and a done-for-you plan that takes the stress out of mealtime.