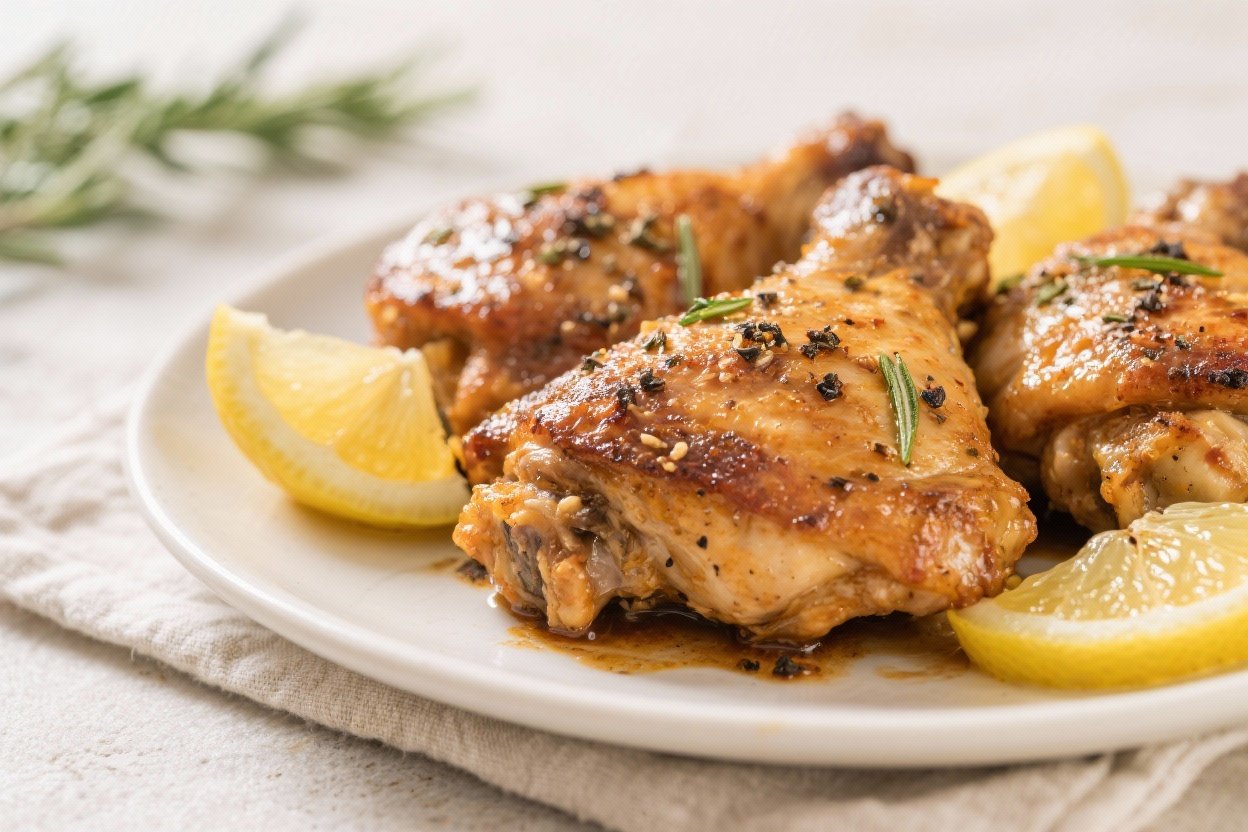
Lemon Pepper Chicken Thighs – Bright, Zesty, and Crispy
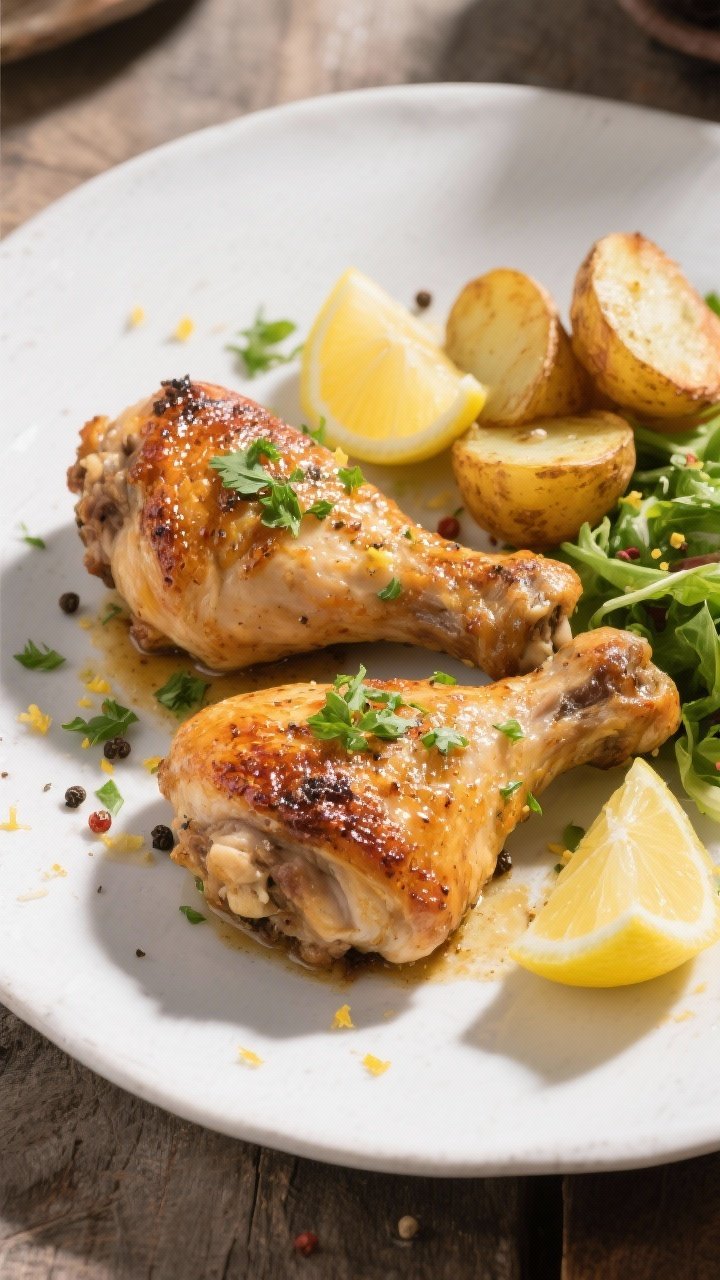
These Lemon Pepper Chicken Thighs bring bold flavor with minimal effort. The skin turns golden and crisp, while the meat stays juicy and tender. A pop of lemon and freshly cracked black pepper keeps every bite bright and balanced.
It’s the kind of weeknight dinner you can pull off without fuss, yet it tastes special enough for company. Serve it with roasted potatoes, rice, or a simple salad, and dinner is done.

Lemon Pepper Chicken Thighs - Bright, Zesty, and Crispy
Ingredients
- 6 bone-in, skin-on chicken thighs (about 2 to 2.5 lbs)
- 1 tablespoon lemon zest (from 1–2 lemons)
- 2 tablespoons fresh lemon juice
- 2 teaspoons coarse kosher salt (use 1.5 teaspoons if using fine salt)
- 1.5 teaspoons freshly cracked black pepper (coarse grind)
- 1 teaspoon garlic powder
- 1 teaspoon onion powder
- 1 teaspoon smoked paprika (or sweet paprika)
- 2 tablespoons olive oil
- 1 tablespoon unsalted butter (optional, for extra richness)
- Lemon wedges, for serving
- Fresh parsley or chives, chopped (optional garnish)
Instructions
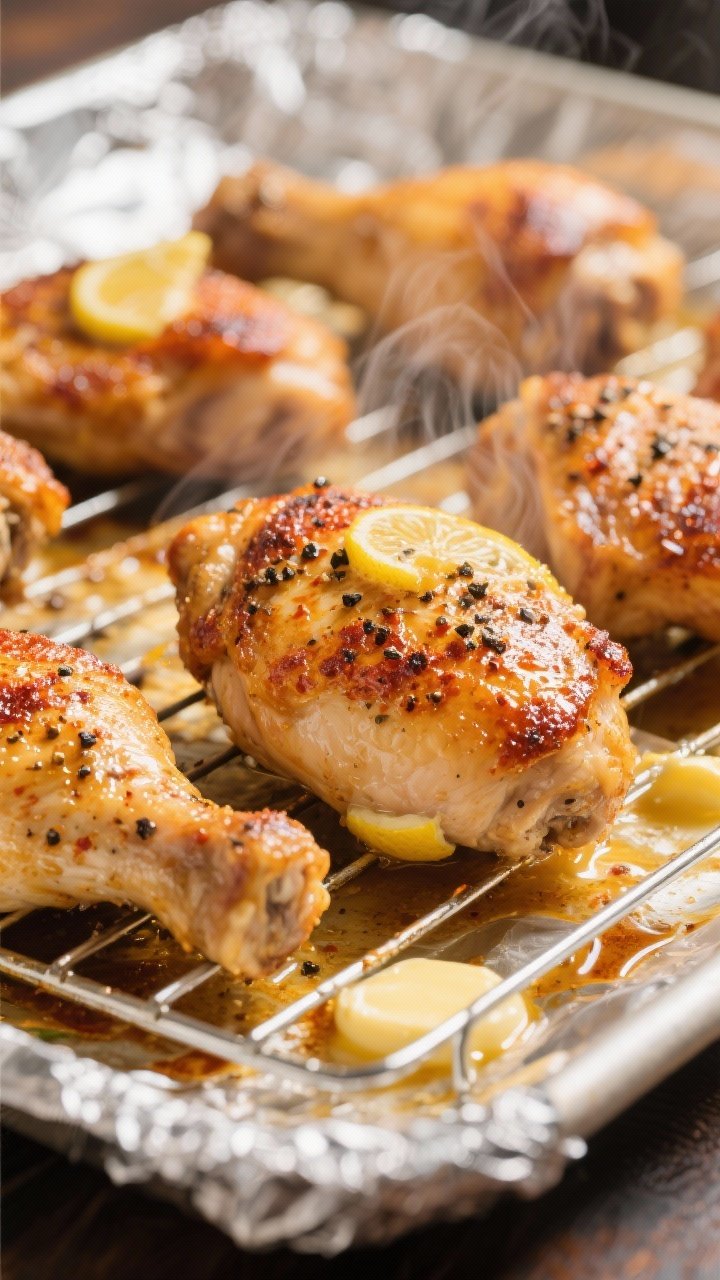
- Prep the chicken: Pat the chicken thighs very dry with paper towels. Trim excess skin or fat if needed. Place on a baking sheet lined with foil and a wire rack, if you have one.
- Season generously: In a small bowl, mix salt, black pepper, garlic powder, onion powder, and paprika. Sprinkle the mixture evenly over both sides of the chicken, focusing extra on the skin.
- Add lemon and oil: Drizzle the thighs with olive oil and rub it in. Sprinkle the lemon zest over the skin, pressing gently so it sticks. Set the lemon juice aside for later.
- Optional dry rest: For extra-crispy skin, let the seasoned chicken sit uncovered in the fridge for 20–30 minutes while you preheat the oven. This step draws out surface moisture.
- Preheat the oven: Heat to 425°F (220°C). Place an oven rack in the center and another near the top for broiling later.
- Roast: Bake the chicken skin-side up for 30–35 minutes, or until the internal temperature reaches 165°F (74°C) in the thickest part without touching bone.
- Crisp the skin: Turn the oven to broil on high. Broil for 1–3 minutes, watching closely, until the skin is deep golden and crispy. Don’t walk away.
- Finish with lemon: Remove from the oven and immediately spoon or brush the lemon juice over the thighs. If using butter, dot a little on each thigh to melt over the hot skin.
- Rest and serve: Let the chicken rest for 5 minutes. Garnish with chopped parsley or chives and serve with lemon wedges.
Overeating is a pattern. This helps you fix that problem. A quick reset for cravings, snacking, and “I’ll start tomorrow” moments.
Built for busy home cooks who want real-life structure. Simple steps that fit meal prep, family dinners, and late-night snack attacks.
Why This Recipe Works
This recipe focuses on a few simple techniques that deliver big results. Bone-in, skin-on chicken thighs are naturally juicy and forgiving, so they stay tender even if you cook them a bit longer.
- Dry skin equals crisp skin: Patting the chicken dry and giving it a brief rest with salt helps draw out moisture for better browning.
- Layered lemon flavor: Zest gives fragrant citrus oils, while juice adds acidity.
Both bring brightness without overpowering the chicken.
- Freshly cracked black pepper: Coarse grind provides a peppery bite and slight crunch that complements the crispy skin.
- Oven-first method: Baking cooks the chicken evenly, then a quick broil crisps the skin for that irresistible finish.
Ingredients
- 6 bone-in, skin-on chicken thighs (about 2 to 2.5 lbs)
- 1 tablespoon lemon zest (from 1–2 lemons)
- 2 tablespoons fresh lemon juice
- 2 teaspoons coarse kosher salt (use 1.5 teaspoons if using fine salt)
- 1.5 teaspoons freshly cracked black pepper (coarse grind)
- 1 teaspoon garlic powder
- 1 teaspoon onion powder
- 1 teaspoon smoked paprika (or sweet paprika)
- 2 tablespoons olive oil
- 1 tablespoon unsalted butter (optional, for extra richness)
- Lemon wedges, for serving
- Fresh parsley or chives, chopped (optional garnish)
How to Make It
- Prep the chicken: Pat the chicken thighs very dry with paper towels. Trim excess skin or fat if needed. Place on a baking sheet lined with foil and a wire rack, if you have one.
- Season generously: In a small bowl, mix salt, black pepper, garlic powder, onion powder, and paprika.
Sprinkle the mixture evenly over both sides of the chicken, focusing extra on the skin.
- Add lemon and oil: Drizzle the thighs with olive oil and rub it in. Sprinkle the lemon zest over the skin, pressing gently so it sticks. Set the lemon juice aside for later.
- Optional dry rest: For extra-crispy skin, let the seasoned chicken sit uncovered in the fridge for 20–30 minutes while you preheat the oven.
This step draws out surface moisture.
- Preheat the oven: Heat to 425°F (220°C). Place an oven rack in the center and another near the top for broiling later.
- Roast: Bake the chicken skin-side up for 30–35 minutes, or until the internal temperature reaches 165°F (74°C) in the thickest part without touching bone.
- Crisp the skin: Turn the oven to broil on high. Broil for 1–3 minutes, watching closely, until the skin is deep golden and crispy.
Don’t walk away.
- Finish with lemon: Remove from the oven and immediately spoon or brush the lemon juice over the thighs. If using butter, dot a little on each thigh to melt over the hot skin.
- Rest and serve: Let the chicken rest for 5 minutes. Garnish with chopped parsley or chives and serve with lemon wedges.
Storage Instructions
- Refrigerator: Store leftovers in an airtight container for up to 4 days.
Keep the skin on top to help preserve crispness.
- Freezer: Freeze in a freezer-safe bag or container for up to 3 months. Press out extra air to avoid freezer burn.
- Reheat: Rewarm in a 375°F (190°C) oven for 10–15 minutes, or air-fry at 360°F (182°C) for 5–8 minutes to revive the skin. Avoid microwaving if you want to keep the skin crisp.

Benefits of This Recipe
- Weeknight-friendly: Short prep time and hands-off cooking make this easy for busy days.
- Budget-conscious: Chicken thighs are affordable and full of flavor.
- High reward, low effort: Simple ingredients, big payoff in taste and texture.
- Versatile: Pairs well with potatoes, rice, pasta, or a fresh green salad.
- Meal-prep ready: Keeps well and reheats beautifully, especially in the oven or air fryer.
Common Mistakes to Avoid
- Skipping the pat-dry step: Moist skin won’t crisp.
Blot thoroughly before seasoning.
- Using pre-ground pepper only: Freshly cracked black pepper adds texture and better flavor. If you only have pre-ground, use slightly less to avoid harshness.
- Overloading with lemon juice before baking: Acid can soften the skin. Save the juice for the end so the skin stays crisp and the flavor stays bright.
- Undercooking: Thighs need to reach 165°F.
If they’re small, start checking at 25 minutes; if large, they may need closer to 40 minutes.
- Broiling without watching: The difference between crisp and burnt is 30 seconds. Keep the oven light on.
Variations You Can Try
- Buttery Pan Sauce: After roasting, remove the chicken and deglaze the pan with 1/3 cup chicken broth and a squeeze of lemon. Whisk in 1 tablespoon butter and pour over the thighs.
- Herb Boost: Add 1 teaspoon dried thyme or Italian seasoning to the spice mix, or finish with fresh rosemary or dill.
- Garlic-Lemon Butter: Melt 2 tablespoons butter with 2 minced garlic cloves.
Brush over the chicken during the last 5 minutes of roasting.
- Spicy Kick: Add 1/2 teaspoon red pepper flakes or a pinch of cayenne to the seasoning blend.
- Air Fryer Method: Cook at 380°F (193°C) for 18–22 minutes, flipping at 12 minutes. Finish with lemon juice.
- Boneless, Skinless Option: Use the same seasoning but cook at 425°F for 18–22 minutes. Broiling is optional since there’s no skin.
FAQ
Can I use bottled lemon juice?
You can, but fresh lemon makes a noticeable difference.
The zest is key to getting that vibrant citrus aroma, so try to use at least fresh zest even if the juice is bottled.
Do I need a wire rack?
No, but it helps air circulate for crispier skin. If you don’t have one, place the chicken directly on a foil-lined sheet and avoid overcrowding.
How do I know when the chicken is done?
Use an instant-read thermometer. Aim for 165°F (74°C) in the thickest part without touching bone.
The juices should run clear, and the skin should be nicely browned.
What sides go well with lemon pepper chicken?
Roasted potatoes, garlic rice, buttered noodles, grilled asparagus, green beans, or a crisp salad all work well. Something starchy plus something green is a reliable combo.
Can I marinate the chicken?
Yes, but keep lemon juice minimal in the marinade to avoid mushy skin. Use oil, spices, and zest to marinate for up to 8 hours, then pat dry and add more seasoning before baking.
Is this recipe gluten-free?
Yes, as written it’s naturally gluten-free.
Just make sure any spice blends or broth you add are certified gluten-free if needed.
How do I keep the skin from sticking?
Use a light coating of oil on the rack or foil, and don’t move the chicken too early. Once the skin renders and browns, it releases more easily.
Can I make it ahead?
You can season the chicken and refrigerate it uncovered for up to 8 hours. Roast just before serving, and re-crisp under the broiler if needed.
Final Thoughts
Lemon Pepper Chicken Thighs hit that sweet spot of simple, reliable, and crowd-pleasing.
With a few pantry spices, fresh lemon, and the right technique, you get crispy skin and juicy meat every time. Keep this recipe in your weeknight rotation, and customize it with herbs, spice, or a quick pan sauce. It’s an easy win that tastes like you put in a lot more effort than you did.
Printable Recipe Card
Want just the essential recipe details without scrolling through the article? Get our printable recipe card with just the ingredients and instructions.