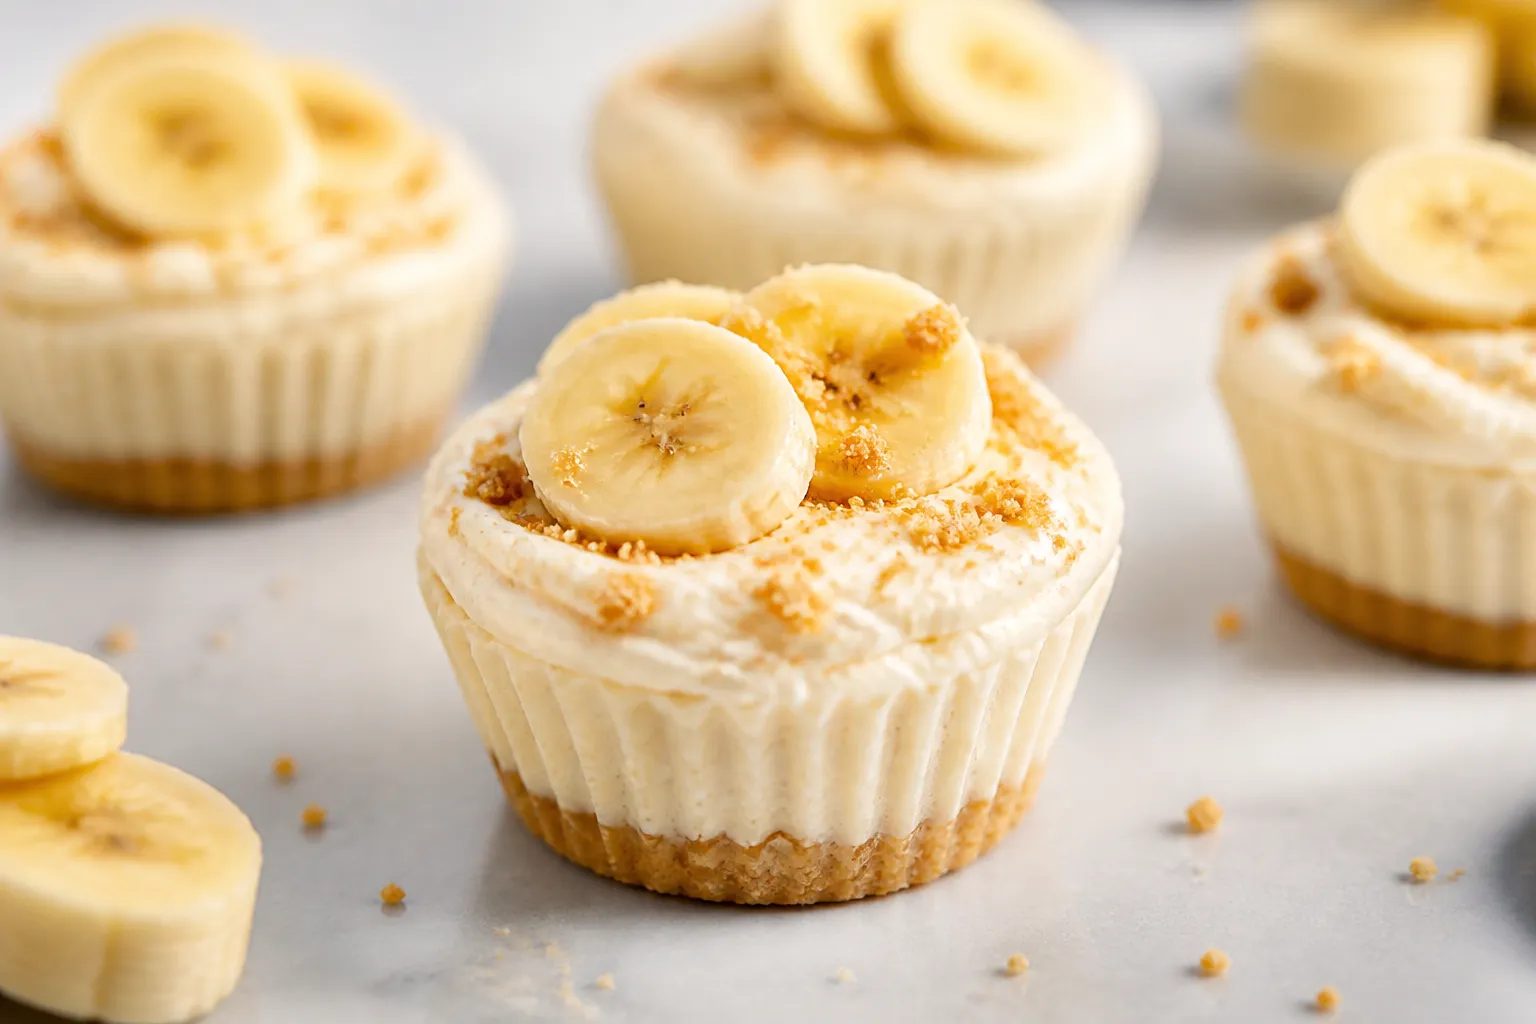
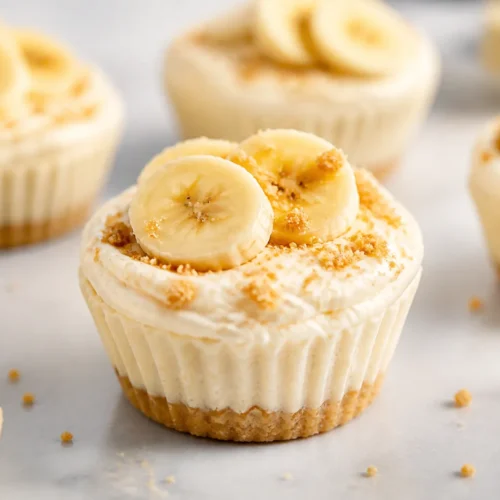
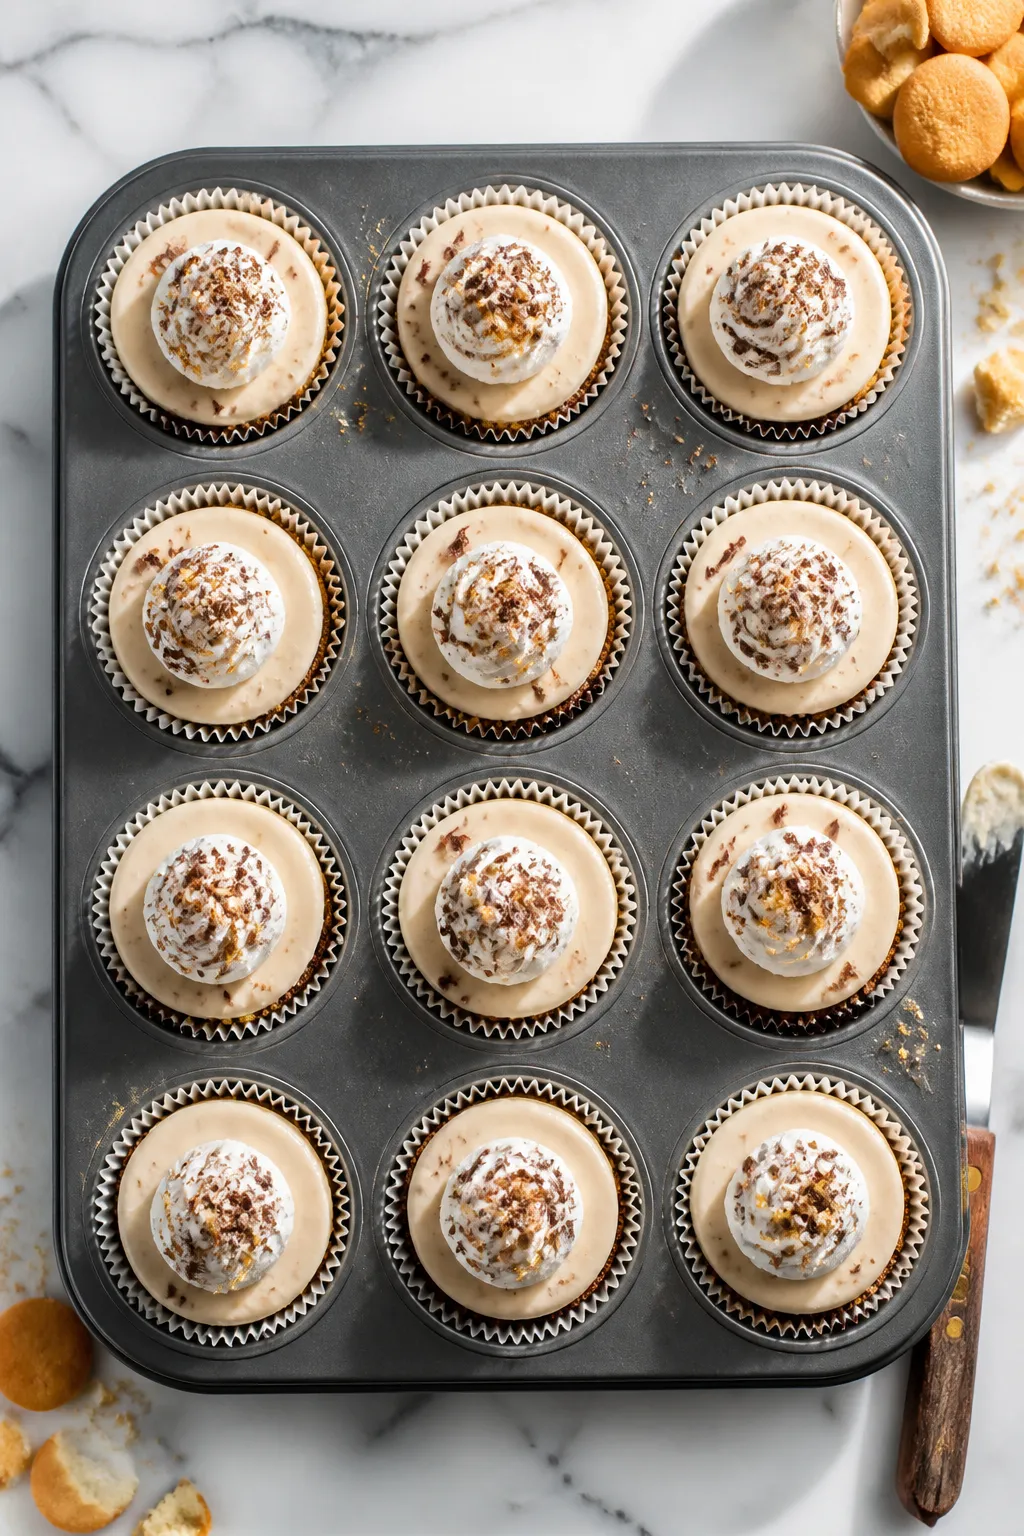
High Protein Banana Cream Pie Protein Cups – Creamy, No-Bake Treats With A Protein Boost
If you love banana cream pie but want something lighter and more protein-packed, these banana cream pie protein cups hit the sweet spot. They’re creamy, lightly sweet, and easy to grab from the fridge when you want a treat that actually keeps you full. No baking, no fuss—just a few simple steps and wholesome ingredients.
Never wonder what's for dinner again.
Get 7 healthy, family-friendly dinners complete with recipes, grocery lists, and simple meal plans delivered straight to your inbox.
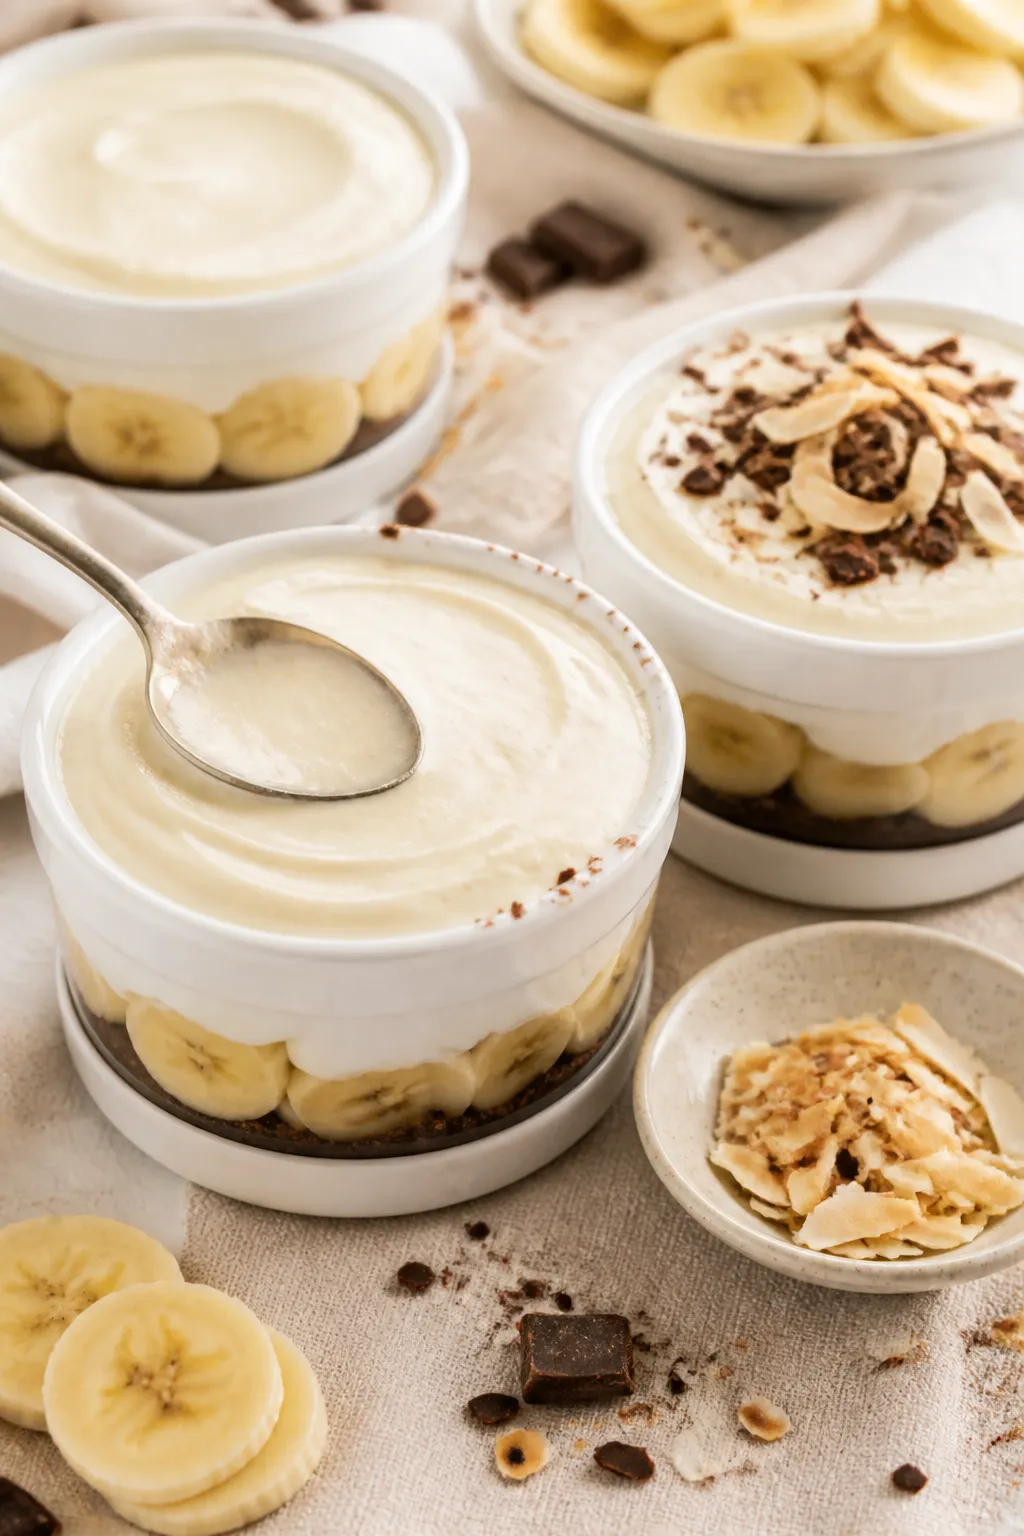
The texture is silky and mousse-like with a crunchy, chocolatey base that makes each bite feel special. Whether you’re fueling a workout or just craving dessert, these are a reliable go-to.
High Protein Banana Cream Pie Protein Cups - Creamy, No-Bake Treats With A Protein Boost
Ingredients
- For the crust: 1 cup chocolate graham cracker crumbs or chocolate wafer crumbs (or chocolate rice cakes crushed for a lighter option)
- 2 tablespoons coconut oil or melted butter
- 1 tablespoon maple syrup or honey (optional, for a sweeter crust)
- Pinch of salt
- For the filling: 1 large ripe banana (spotty is best for sweetness)
- 1 1/4 cups plain Greek yogurt (2% or 0%, or dairy-free yogurt)
- 1/2 cup vanilla or banana-flavored whey or plant-based protein powder
- 2 tablespoons vanilla instant pudding mix or 1 tablespoon cornstarch for thickening
- 2–3 tablespoons maple syrup or honey, to taste
- 1 teaspoon vanilla extract
- Pinch of salt
- 2–3 tablespoons milk of choice, as needed to thin (start with less)
- For layering and topping: 1 banana, thinly sliced
- Crushed vanilla wafers or graham crackers (optional)
- Whipped cream or coconut whipped cream (optional)
- Shaved dark chocolate or chocolate chips (optional)
- Toasted coconut flakes (optional)
- Equipment: Muffin tin with liners or 6–8 small ramekins/cups
- Mixing bowls and whisk (or a blender)
- Measuring cups and spoons
Instructions
- Prep your cups: Line a muffin tin with paper or silicone liners, or set out small ramekins.
- Make the crust: In a bowl, mix the chocolate crumbs, melted coconut oil or butter, optional sweetener, and a pinch of salt until it looks like wet sand.
- Press the crust: Spoon 1–2 tablespoons of crust mixture into each cup. Press down firmly with the back of a spoon. Set aside.
- Blend the filling base: In a bowl (or blender), mash the ripe banana well. Add the Greek yogurt, protein powder, pudding mix or cornstarch, maple syrup or honey, vanilla, and salt.
- Adjust consistency: Whisk until smooth. If it’s too thick, add milk 1 tablespoon at a time until creamy and spoonable, like pudding. Taste and adjust sweetness.
- Layer with banana slices: Place 2–3 thin banana slices over each crust. This adds flavor and helps lock in moisture.
- Fill the cups: Spoon the filling over the bananas, dividing evenly. Tap the tray gently to level the tops.
- Chill to set: Refrigerate for at least 2 hours, or until the filling is firm enough to hold its shape. Overnight is ideal for the best texture.
- Add toppings: Before serving, add a small dollop of whipped cream, a sprinkle of crushed wafers, shaved chocolate, or toasted coconut if you like.
- Serve: Peel off liners and enjoy straight from the fridge. They’re best cold.
What Makes This Recipe So Good
- High protein without chalkiness: The Greek yogurt and protein powder blend into a smooth, pudding-like filling.
- No-bake and quick: You can assemble these in under 20 minutes, then let the fridge do the rest.
- Balanced sweetness: Natural banana flavor plus a touch of maple syrup or honey—no need for heavy sugar.
- Great meal prep: They hold well in the fridge for days, so you can make a batch for the week.
- Customizable: Swap the protein powder flavor, use dairy-free options, or change the crust to fit your needs.
What You’ll Need
- For the crust:
- 1 cup chocolate graham cracker crumbs or chocolate wafer crumbs (or chocolate rice cakes crushed for a lighter option)
- 2 tablespoons coconut oil or melted butter
- 1 tablespoon maple syrup or honey (optional, for a sweeter crust)
- Pinch of salt
- For the filling:
- 1 large ripe banana (spotty is best for sweetness)
- 1 1/4 cups plain Greek yogurt (2% or 0%, or dairy-free yogurt)
- 1/2 cup vanilla or banana-flavored whey or plant-based protein powder
- 2 tablespoons vanilla instant pudding mix or 1 tablespoon cornstarch for thickening
- 2–3 tablespoons maple syrup or honey, to taste
- 1 teaspoon vanilla extract
- Pinch of salt
- 2–3 tablespoons milk of choice, as needed to thin (start with less)
- For layering and topping:
- 1 banana, thinly sliced
- Crushed vanilla wafers or graham crackers (optional)
- Whipped cream or coconut whipped cream (optional)
- Shaved dark chocolate or chocolate chips (optional)
- Toasted coconut flakes (optional)
- Equipment:
- Muffin tin with liners or 6–8 small ramekins/cups
- Mixing bowls and whisk (or a blender)
- Measuring cups and spoons
How to Make It
- Prep your cups: Line a muffin tin with paper or silicone liners, or set out small ramekins.
- Make the crust: In a bowl, mix the chocolate crumbs, melted coconut oil or butter, optional sweetener, and a pinch of salt until it looks like wet sand.
- Press the crust: Spoon 1–2 tablespoons of crust mixture into each cup. Press down firmly with the back of a spoon.
Set aside.
- Blend the filling base: In a bowl (or blender), mash the ripe banana well. Add the Greek yogurt, protein powder, pudding mix or cornstarch, maple syrup or honey, vanilla, and salt.
- Adjust consistency: Whisk until smooth. If it’s too thick, add milk 1 tablespoon at a time until creamy and spoonable, like pudding.
Taste and adjust sweetness.
- Layer with banana slices: Place 2–3 thin banana slices over each crust. This adds flavor and helps lock in moisture.
- Fill the cups: Spoon the filling over the bananas, dividing evenly. Tap the tray gently to level the tops.
- Chill to set: Refrigerate for at least 2 hours, or until the filling is firm enough to hold its shape.
Overnight is ideal for the best texture.
- Add toppings: Before serving, add a small dollop of whipped cream, a sprinkle of crushed wafers, shaved chocolate, or toasted coconut if you like.
- Serve: Peel off liners and enjoy straight from the fridge. They’re best cold.
Storage Instructions
- Refrigerator: Store covered for up to 4 days. If using fresh banana slices on top, add those right before serving to prevent browning.
- Freezer: Freeze without whipped cream for up to 2 months.
Thaw in the fridge for a few hours. The texture will be a little icier but still tasty.
- Meal prep tip: Keep crusts and filling separate in airtight containers if you want the crispest texture. Assemble the night before eating.
Benefits of This Recipe
- Protein-rich: Each cup delivers a satisfying dose of protein thanks to Greek yogurt and protein powder.
- Lower in sugar than traditional pie: Sweetness comes mostly from ripe bananas and a small amount of honey or maple syrup.
- Better-for-you fats: Coconut oil or butter in the crust adds richness with control over portion size.
- Portion controlled: Individual cups make it easy to enjoy dessert without overdoing it.
- Gluten-free and dairy-free friendly: Simple swaps make it fit many diets.
Common Mistakes to Avoid
- Using an unripe banana: Green or just-yellow bananas are less sweet and add a starchy taste.
Go for spotty, soft bananas.
- Over-thinning the filling: Too much milk will keep it from setting. Add liquid slowly until the texture is like thick pudding.
- Skipping chill time: The cups need time to firm up. Rushing this step leads to runny, messy layers.
- Watery yogurt: If your yogurt is very thin, strain it through a towel for 10–15 minutes, or use a thicker Greek yogurt.
- Too little fat in the crust: The crust won’t hold together if it’s too dry.
It should clump when pressed.
Alternatives
Need More Easy Dinner Ideas?
Get my FREE 7-Day Easy Dinner Reset and enjoy a full week of healthy dinners without the meal-planning stress.
- Dairy-free: Use a thick coconut or almond milk yogurt and a plant-based protein powder. Top with coconut whipped cream.
- Cookie crust swaps: Try vanilla wafer crumbs, graham crackers, or gluten-free cookies. For low-carb, use almond flour, cocoa powder, a touch of sweetener, and melted butter.
- Protein powder flavors: Vanilla, banana, white chocolate, or even caramel work well.
Unflavored protein needs a bit more sweetener and vanilla.
- No pudding mix: Use 1 tablespoon cornstarch or 2 teaspoons instant clear gelatin. For a natural thickener, 1–2 tablespoons of instant mashed potato flakes can subtly thicken without flavor.
- Extra crunch: Add chopped nuts, cacao nibs, or a thin layer of melted dark chocolate over the crust before adding bananas.
- Lower sugar: Skip the added sweetener and rely on ripe bananas and flavored protein powder.
FAQ
Can I make these without protein powder?
Yes. Replace the protein powder with 1/4 cup powdered milk or 1/4 cup additional Greek yogurt plus 1 tablespoon cornstarch.
Sweeten to taste and add extra vanilla for flavor.
What’s the best yogurt to use?
A thick Greek yogurt (2% or 5%) gives the creamiest, most dessert-like texture. Fat-free works but can taste tangier and slightly less rich. If using dairy-free yogurt, choose a high-protein, thick style.
How do I keep the bananas from browning?
Toss slices in a little lemon juice or pineapple juice, then pat dry.
Also, tuck banana slices under the filling rather than on top. Add any decorative slices right before serving.
Can I make one big pie instead of cups?
Absolutely. Press the crust into a 9-inch pie dish, add bananas and filling, and chill 4–6 hours.
Slice carefully since the filling is softer than a baked pie.
Why did my filling turn grainy?
Some protein powders don’t dissolve well. Whisk thoroughly, let it rest 5 minutes, then whisk again. If needed, blend in a blender for a few seconds to smooth it out.
How much protein is in each cup?
It varies by ingredients, but a typical cup made with Greek yogurt and whey protein lands around 12–18 grams of protein.
Check your labels and divide by the number of cups you make.
Can I make these ahead for an event?
Yes. Make them up to 24 hours ahead. Add whipped cream, cookie crumbles, and fresh banana slices right before serving for the best look and texture.
Final Thoughts
These High Protein Banana Cream Pie Protein Cups bring the comfort of a classic dessert with a smart, satisfying twist.
They’re quick to prep, easy to customize, and perfect for weekly meal prep or a no-fuss sweet ending. Keep a batch in your fridge, and you’ve got a creamy treat ready whenever the craving hits—no oven required. Simple ingredients, great flavor, and a solid protein boost make this one a keeper.
Printable Recipe Card
Want just the essential recipe details without scrolling through the article? Get our printable recipe card with just the ingredients and instructions.
Loved This Recipe?
If you're looking for more simple, healthy dinners your family will actually eat, grab my FREE 7-Day Easy Dinner Reset. You'll get 7 easy dinner recipes, simple grocery lists, and a done-for-you plan that takes the stress out of mealtime.